Monday, November 25, 2013

Introducing The Home Of Our Infamous Murphy Bed, Part 1

Do you all remember the saga of the Murphy Bed?

We bought it somewhat impulsively when we thought we were moving into a small house on the lake. The house fell through, there were tears and more tears. There was also now a Murphy Bed that we no longer had any use for.

Here is the pretty lady:


Then we found another tiny house and... tada! Ol' Murpherino suddenly became valuable to us again. The only problem was hiding an enormous Murphy Bed in bits and pieces around our old house while we tried to make it ready to go on the market. Somehow we managed to do so. In the process we broke it into as many pieces as we possibly could. There were quite a few people out there who had their doubts the Murphty Dumpty would ever get put back together again.

I am here to tell you that a miracle has happened and Murphenella is 98% put back together like brand new. There was a mattress mix-up and a little door snafu but otherwise, things are good in Murphy Land!

I debuted the plans for Murphy Doodle in this post. A few months later I am finally ready to show her off in all of her glory for real.

Change of plans... I just checked out how many photos it was going to take for me to get you to where Murphobama is now so we are going to go ahead and break this bad boy down into two posts.

Part 1: Take a look at the room, see some progress being made on MurhhyDoDa, and check out my to do list.

To Do List:

  • Put up the murphy bed (somehow manage to get it back together, bolt the hinged bed frame into the concrete floor, get the lights working on it, attach it to the wall)
  • Put away the 1,000 paintings that are all over the room
  • Paint the room
  • Put up paintings
  • Put up art
  • Put up blinds
  • Pretty up bookshelves

Here is the room before we moved in:


Move in day explosion:


The door on the left is Scott's cubby hole of an office and the door on the right is the bathroom. Those fancy doors in the middle belong to everyone's favorite hidden bed, Mrs. Murphy. 

Wooooooooooooooo HOOOOOOOOO!!! One section of Murph-Town was officially aseembled!

Part 2 of Murphy installation- almost all of the parts were set up where they would ultimately reside. 

The room was even starting to get a bit more organized but I am not sure you can really tell that from this photo. 

While Big Murph was in the process of being assembled (we strung the whole process out over 2 months) our guests got to sleep on lovely mattress-on-the-floor-accommodations.  

Luckily, our handy man extraordinaire had a hammer drill/ air hammer/ concrete drill. I am not sure what the name for the tool really is but I made sure to always refer to it as something different. Whatever the tool is called, you need it in order to screw into concrete.

That is where I am leaving you off today. I know this has been a super exciting edition of Never Listless. Just you wait until the doors go up and you see Murphy shining in all of her glory. You are going to be begging me to come up with Part 3 of the Murphy Brown saga.

Monday, November 18, 2013

Lighting Lighting Lighting!

Wahooooo! The lights are up and looking good on our main level. We have been putting it into overdrive trying to get our house looking good before we take off lots of time to figure out how people manage to have 2 children. (ps I really ought to have 2 children by now. If I don't that means that I am 2 weeks past my due date. But I wrote this post a week and some change before my the new baby is due so who knows!).

Let's take a look at the lighting process:
When we moved in we had the regular builder-grade lighting. I do believe that the super technical term for these fellas is "boob lighting" although I usually go to extremes to avoid saying it.


Their Replacement:


Here they are Replaced:
Before & After In The Hall:


The Living Room:
Before

After:

I like these lights a thousand times better but I think they are missing something. I finally realized what it was... a lot of drum lights like this have a little nipple in the middle of them (sorry for all the chesty references today, but I swear this time it really is the technical term).
Here is an example:

Eventually (this one is getting put on back burner number 500) I plan to DIY a little nipple for these ladies

Are you all lighted out yet? Hold your horses there are still 2 more 2nd level lighting switcheroos coming your way. But you are going to have to wait because this post is getting looooooooooooooong. I hope to see you back next week!

Monday, November 11, 2013

Introducing The Cubby Hole Under The Stairs!

When we first moved into this house I showed you a glimpse of one of my favorite parts of the house, Cora's cubby hole under the stairs.

While the house was being built I showed you my plans for the Cora's playroom under the stairs. I am obviously obsessed with this type of space because when I was little one of my favorite toys was a staircase from my Fisher Price dollhouse that had a secret cubby under it.


I even wrote a whole post about it. And, another one about hide-y holes around the house.


Cora was excited about the idea of the cubby hole from day one. Every time we would check the house out while it was under construction Cora would run to her cubby hole to check it out.


My dad installed a doorbell for Cora that she thought was pretty fantastic!


We put her kitchen in there along with a little table and 2 chairs.


Then, I went shelf-wild. I wanted to make sure the storage was maximized.


I put up a mirror that I found floating around the house. Doing so made Cora refer to the kitchen as her bathroom kitchen for about a week. I guess bathrooms are the only place in our house that we have mirrors right now.


I put some hooks under one of the shelves for all of Cora's bags. Any time a random bag makes its way into our house she immediately tries to hijack it. She refers to all bags as her "work bag" and likes to load up as many as possible on her shoulder at one time. She decided one of her bags is Scott's work bag. Every once in a while when he is leaving for work she will run to get it for him and she will laugh to herself about how crazy it is that he could have almost left it behind had she not reminded him.


Whenever I come across a picture that I think Cora might like up on her cubby hole wall or someone sends her a postcard I put that up on the wall too. It is beginning to feel quite homey!


There are a couple more things that I would like to do in her cubby hole but, for now, I am checking it off the list.


I spent a lot of time looking around for cubby hole inspiration. Cora's didn't turn out like any of the ones below but in case you found this blog while looking for ideas for playrooms under the stairs, here were some of my favorites:


Monday, November 4, 2013

Nursery In A Closet Update #4: The Last Decorations Go Up!

Today is my due date! I wrote this post a couple of weeks ago knowing that I would probably have too much going on today to write a blog post. 

This nursery in a closet makes me very happy! There are just a couple of things left for me to write about and I am going to cover most of them today.

The Crocheted Fish Mobile (purchased here)!
Isn't she lovely?!?!

I tried hanging it with this ribbon first:

But I was not in love so I ended up with this one:

Would you like a few more fish mobile photos? I hope the answer is yes!


I also made some little hangy type things. I mainly made them because the space seemed a little unbalanced to me. At first, I was looking for some sea-themed hooks that were fun and playful like the dog tail hooks that we had in Cora's old nursery

I found a whale tail hook that was great but too expensive for such a tiny thing
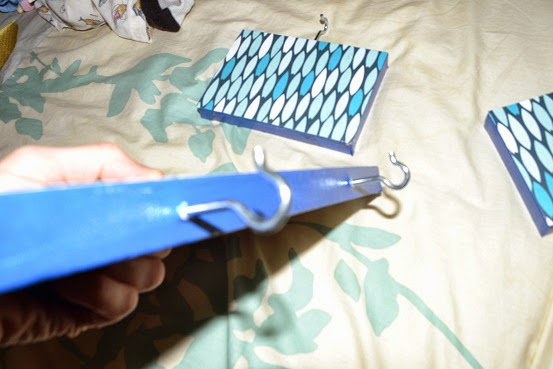
I found a few other options but they all were either too expensive or too big. So, I went hook shopping in my house and came up with a few small canvases and some scrapbook paper.
This photo is pretty ridiculous... I didn't realize that my belly had made its way into the shot until I downloaded this photo and tried to figure out what in the world it was.


  • I painted the sides of my canvases blue


  • Traced the size of the canvas on the scrapbook paper and cut it out


  • Then I glued the paper onto the canvas and added hooks. Isn't this paper perfect!?! It matches the fish fabric wall so well.

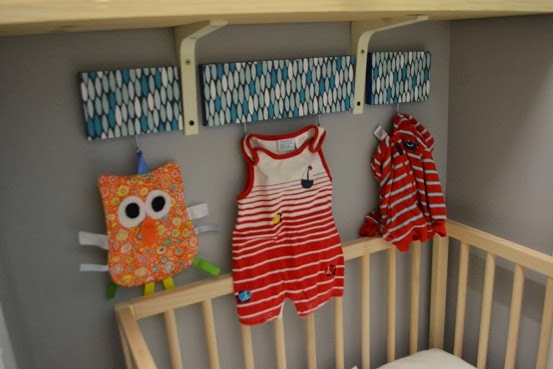
And here is how they came out!
The baby will not sleep in the crib long enough to be able to pull himself up to a standing position and access those hooks. If he is anywhere near that point those hooks will be long gone.


I'm not sure exactly what I will hang on them. Clothes, toys? Here are a couple of random possibilities:


You have now seen all of the parts of this nursery in a closet come together. I may drag this out into one more blog post with a full on photo shoot. Maybe there will even be a new little baby hanging out in the shoot. It would not be difficult to get a bigger little baby toddler to hang out in there for some photos. That girl thinks every baby item that comes back on the scene is the coolest new toy in the world.

In case you are looking for past blogs about this nursery in a closet, you can find them here:
Nursery in a closet ideas
The fabric goes up
Crib goes in, art goes up
The shelves go up and get decorated