Showing posts with label Ikea. Show all posts

Wednesday, March 20, 2013

Making Over A Kid's Table & Chairs, Part 1

I am a bit behind... I still owe you a 2nd post about our Christmas 2012. You will see it over on The Etc Lists within the next couple weeks. For Christmas, I gave a little table and chairs set. It is called Latt and it is from Ikea. As usual, I couldn't leave the set just like I bought it. I had to dress it up a bit. Also, as usual, it took me about 10 extra tries to get it right. You get to see all of my exciting spazzy errors in Part 2 of the Ikea Table.

Here is the before and after:

I do love some green!

I always start a project with some serious brainstorming. I think about the colors I want to use and I picture what kind of vibe I want to end up with. As soon as my brain has exhausted all of its ideas I head on over to the Google machine. I like to see what other people have come up with. 
From my brainstorming I knew that I wanted a chalkboard top and plenty of color.

Here are some of my favorites Latt Hacks (the sources are at the end of this post):

A colorful top! I hadn't even considered just painting one area. Google was already up 1 on me.

Fabric and paint! Fantastic! I loved the idea, but was worried about the durability. 

Another inspired person wrapped their Latt chairs in fabric. Pretty funky! 

Who doesn't love a map! This one is super neat, but not quite the vibe I was going for. 

This Map Latt was closer to my vibe, but I do not have near enough talent to make that.

A chalkboard top! And, they color-blocked the chairs. A great idea! 

I was excited to find this one. Ikea green was one of the colors I was considering. So, I was happy to see that someone else had already tested it out for me. And, with a chalkboard top! This was about as close as I was going to get to what I was looking for. 

I drew up a possible design for the chair tops in my favorite program, Microsoft Paint. I wasn't sure what colors I wanted to use so I drew up 4 possibilities.

Now you know the riveting process that went into my Latt-hacking. I'm sure you are losing your mind with excitement about Part 2 coming up soon. 

I will give you one more sneak peak. This photo is from the first time I showed Cora that you could write on the table with chalk. I wrote, "Cora's Big Girl Table" and she insisted that I also draw a hat. So, a sombrero was drawn.

Time for Wednesday's Weekly Rather Question:

WYR:
dfsf be caught in a serious nose pick on national TV (like this guy)

or
have to wear a very strange cartoon-looking sombrero (like the one I drew above) 2 hours per day every day for the next year?


Wednesday, November 14, 2012

Hacking The Expedit: Turning A Bookcase Into A Coffee Table

There is a website called Ikea Hackers that is  devoted to altering Ikea products. It is fabulous.

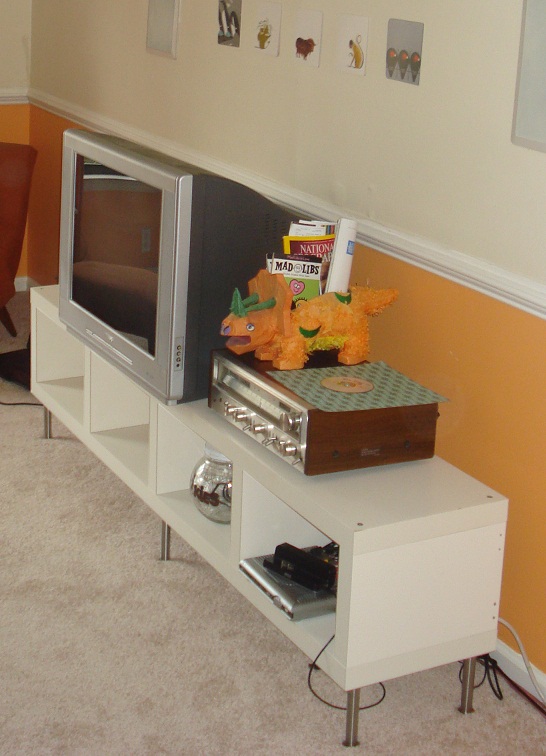
This hack has been done a 100 times but I am going to make it 101! And I am going to include some step by step action AND an orange dinosaur pinata! Take that hackers!


This lovely Expedit shelving unit was bought from Senor Craigslist himself for a mere $20. If you live in a fairly metro area near an Ikea you can almost always find some kind of Expedit piece on Senor Craigslist.

I bought 2 sets of Capita 8" legs (4/pack) for $14 each.
I laid out where I wanted the legs to go. I was only planning to use six of the legs. But, I knew there was a chance I might use the finished product as a window seat. So, I threw the other two on for a bit more stability.

 I marked where the screws needed to go with a Sharpie then I moved the metal plate.

I didn't feel like getting a drill bit. So, I used the screws as the drill bit. I screwed each one into its place then unscrewed those suckas right out of there.

I screwed the plates into place, attached the legs and wa-la! Finito! 


Mrs. Ex-Pita (get it- a combo of Expedit and Capita... my goodness, what a creative name!) tried her hand out as a media console. Look at all of that media- it is like we are totally hip media geeks who have to have the latest thing. And helllllllo orange dinosaur pinata. I have been waiting to feast my eyes on you all day!


You've seen her (Mrs. Ex-Pita) pop up in Cora's nursery as a window seat. She lived there for about a month while the room was still in the "throw all the extra furniture in there and see what works"phase.


Mrs. Ex-Pita finally found a place to live as a coffee table in the funky retro bonus room. But I can't show you that yet because we are still counting down the chronicles to the big reveal!


And now the Would You Rather of the day!

WYR... go 8 years without eating any ice cream

or
have to keep your fingernails ridiculously pointed  for 3 weeks (like the ones pictured below but without the fancy design or the bedazzling)?


Sources: ExpeditCapita

Thursday, October 25, 2012

The Nursery Chronicles: Step 3: Wire display


Here we are, back in chronicle land. The Nursery Chronicles is where we be! It is a paradise of yellow, grey, and green. 

Let's get to steppin'

Step 3: Get some more furniture. Start the decorating: Wire display for pictures.


It is time to talk furniture which, to me, obviously means it is time to talk Ikea.
Here are a couple Ikea secrets for you. There are secret cut-throughs in the Ikea showroom and in the Ikea marketplace. Bring me with you and I will get you through the crowds and to the checkout in no time at all. Another little Ikea secret is the hidden gem that Ikea calls the "as-is" section. PS...neither of these things are actually secrets. Everyone knows about them.

The "as-is" section is always the first area I check in Ikea. On one of my weekly Ikea trips while pregnant, I had some luck in the "as-is" section. I bought a little table to go between the daybed and the wall. It was a random space that needed something just the right size. If you know me it should not surprise you to find out that I made a very detailed list of all of the possible items at Ikea, Target, and anywhere else that had random pieces of furniture that might fit. I categorized the possible item by type. Then I pasted a link to the item, wrote the dimensions and how much it cost. Lucky you... I found the list and did a little "print screen" of the first page (out of about 6 pages). Craziness


So, after I spent all of that time making crazy lady lists about potential items to fill the space I found something that was the perfect size in the Ikea as-is section. And it was only $20. I scooped that right up! And did a couple laps with it raised above my head singing the Lion King song about how proud I was to have it. Thankfully, the last part did not really happen. But I was a little bit crazy- I saw it, broke out the tape measure, realized it was perfect and practically ran to the check out. I didn't want to have to cart it around the store the whole time because I knew it would put a damper on my efficiency. And I didn't want to risk someone else seeing it and raising the roof with it. So, I bought it, loaded it into the car and back to Ikea I went.

Here is what I bought.


This is the random space I wanted it to fill.


And here that space is for you... all filled up!


OK- let's readdress the pregnant weekly Ikea trips. I was working hard on Cora's sweet pad. That required a bit more time in Ikea than you would think. I'm not the only Ikea-obsessed pregnant lady though... next time you are at Ikea look around. I guarantee 7 out of 10 people that you see you have got the baby belly going on.

I googled "pregnant Ikea" and this photo of 90210's Jennie Garth popped up of her and her very pregnant belly wheeling her haul away from Ikea.

Onto the fun part. It is finally time to start decorating the nursery! 

I love a good wire display. To me, decorating is all about spacing. I think about what colors and sizes I want in a space. Then, I pick items that help balance things out. And what this space needed for balance was a little wire and some squirrel pictures.

Here is how it went down:

1. I bought two packs of the Dignitet curtain wire from Ikea ($12.99 each) and one package of the Riktig curtain hooks ($2.99).


2. Scott and I installed them. It was frustrating. You have to make sure to get the wire really, really tight or it will sag. We had to do this twice on each row twice. It still isn't super tight but we were happy enough with it.


3. Fabric stash! The fun part!!! I broke out all of my fabric and found 7 different kinds that would work in the room. A number of them had already been purchased specifically for this room.

4. I did a little trial and error and decided what size I wanted my wire hanging items to be. Then, I cut 14 pieces of cardboard to that size.

5. I cut 14 pieces of fabric to a size that was just big enough to wrap each piece of cardboard like a present.


6. I ironed all of the fabric. 

7. I wrapped each piece of cardboard to make sure it fit.


8. I hotglued the fabric to the cardboard.


9. I hung all of the pieces up. I spent forever arranging them into the perfect order.

10. Then I gathered random pictures that I already had, some from online, and some I photocopied from my favorite children's books. I clipped the photos onto the fabric and...

Waaaaaahhhh Laaaaahhh! Consider step 3 complete!

Here are all of the after nursery photos. 


I change out the pictures that are clipped on every once in a while. I try to put in pictures of things Cora loves.... mainly ducks!


There were a lot of steps to get this nursery where it is today. Don't you worry- I am going to go through every little step in some future blog posts for you.

Here they are:


Step 1Get rid of the old furniture and try out some more baby-centric duds for the room. Crib, bookshelf, and daybed.


Step 2Convince my husband to do more painting than anyone would ever want to do in their whole life. Start the painting spree by painting over the headboard on the wall. Get a dresser/ changing table and refinish it.


Step 3: Get some more furniture. Start the decorating: Wire display for pictures.


Step 4: More decorating: Put up the book slings. Floating shelves.


Step 5: Decorations, Part 3: Hang art above the crib and all around the room


Step 6: Refinish side table and get a few more pieces of furniture


Step 7: Paint the chalkboard and mirror and hang them.


Step 8: Put up the curtains. Line the inside of the dresser with some of my extra fabric


Step 9: Paint the mailbox. Finishing touches.


And one more Ikea secret (for the Charlotte store, at least). Park near the exit. Parking is always atrocious near the entrance. This way you can just slip over to the entrance in no time and then be close to your car when you're done. Also, the exit puts you closer to the as-is section which is where I run to first anyway.


Time for the Would You Rather question of the day!

WYR... 
win an all expenses paid trip to the Galapogos Islands for 1 week (and you are still paid your normal salary while you're gone)

or
never have to do yard work ever again... it just magically happens.


image sources: dignitet, riktig

Saturday, September 15, 2012

The Nursery Chronices: Step 1: BABY FURNITURE!

Step 1: Get rid of the old furniture and try out some more baby-centric duds for the room. Crib, bookshelf, and daybed.

So here we are. Step 1 of The Nursey Chronicles. Feel free to read this as a bedtime story to your little ones. They are sure to be riveted.

The dresser was a hand-me-down from Scott's parents. It was a piece of furniture they had purchased when they were married over 40 years ago. So it had certainly had a nice, long life. Our old bud, Senor Craigslist, sold it for us. I feel confident that it went to a good home. The guys who came to pick it up were thrilled about how solid it was. I heard them say, "they just don't make furniture like this anymore" at least 35 times.


The side tables found a new home in a closet.

Our guest bed took residence in the bonus room that we now refer to as our Sweet Guest Suite (we don't actually call it that but I will definitely draft a petition to make sure we start).


After we got most of the furniture out of the room we were ready to load it up with some new digs!


The bookshelves in the photo below came from Ikea. The rocking chair was a gift from my dad to my mom after my sister, Kelly, was born! The long, narrow table was just there for a short time. I wanted to see if it did anything special for the room. It didn't- I sent that table aaah-packing.


The daybed was our big purchase for the nursery. I have been in love with it for years! It's from West Elm. Isn't she a beaut?!!??!


Here is Scott setting up the crib. He isn't into having his photo taken but usually he gives me a nicer face than the one below. That man loves himself some gold pants. 


This concludes the exciting adventures of Step 1 in The Nursery Chronicles.

The Nursery Chronicles will be back next week with a bit more pep in their step and a slightly more exciting post:

Step 2Convince my husband to do more painting than anyone would ever want to do in their whole life. Start the painting spree by painting over the headboard on the wall. Get a dresser/ changing table and refinish it.


Here are the rest of the steps that you have to look forward to:

Step 3: Get some more furniture. Start the decorating: Wire display for pictures.

Step 4: More decorating: Put up the book slings. Floating shelves.

Step 5: Decorations, Part 3: Hang art above the crib and all around the room

Step 6: Refinish side table and get a few more pieces of furniture

Step 7: Paint the chalkboard and mirror and hang them.

Step 8: Put up the curtains. Line the inside of the dresser with some of my extra fabric

Step 9: Paint the mailbox. Finishing touches.


And since I already spilled the beans in The Nursery Chronicles starter post. Here are the after photos: