Showing posts with label cabinets. Show all posts

Friday, January 18, 2013

Introducing... Our Half Bath!

Since I've been posting about bathrooms for the last couple of days I figured I would keep this bathroom train rolling and introduce my half bath. Waaaaahooooo!!! Who is excited!?! And guess what? I am not even going to give it to you in Chronicle form. I am going to show you the before and after in one single post. Can you even imagine!


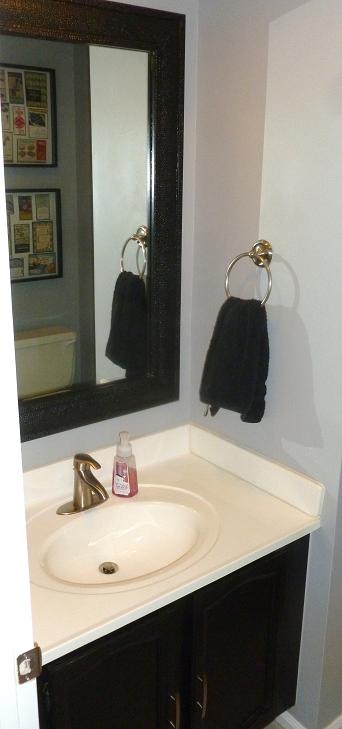
Here is a glimpse at the finished product:

Unfortunately, this is the only photo I have of our bathroom before we changed it.

Bathroom changeover list:

  • That bathroom was like a dungeon so I had my handyman Dave add an extra light to the ceiling. I spraypainted the can light covers to change them from a dingy off-white to a bright white.


  • Painted the 80s oak cabinets black. First, I primed it with Glidden Gripper in gray. Then I painted it the blackiest black color I cound find.

Here is a closeup I had of the vanity from another bathroom we changed out. They were identical.


  • The hardware was changed out for something more my style.


  • We had Handyman Dave (HD) change out the yellowed counter for a nice pure white one.
  • Mister HD changed out the faucet.
  • We took out a towel bar that was meant for serious towels (not hand towels). And, I put up a hand towel bar next to the sink.


  • The builder grade mirror came down and was replaced with a framed one that I bought at Hobby Lobby. Here is a little Hobby Lobby secret: a lot of their stuff is 50% off every other week. So, if you see a mirror you like and it isn't marked down just wait a week and buy it then. You do run the risk of someone else buying the mirror who doesn't know about the 50% off secret!


  • We de-popcorned the ceiling. One day I may share that whole process with you. Our house is about 60% de-popcorned and that is about all we can handle for now. It is pretty hard work!


  • We changed out the door knob and hinges from brass to polished nickel.
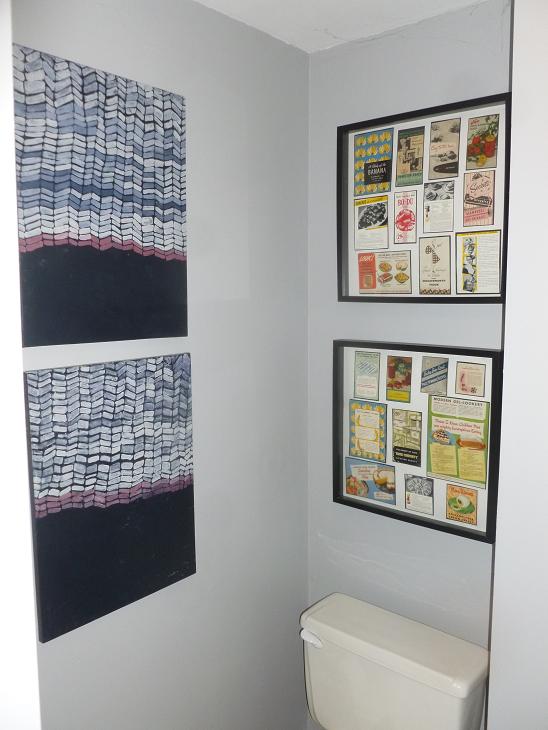
  • Art was added.
I painted the art on the left. When we first moved in we painted the area around the sink a dark rose color. So, I tied the gray and rose color together with the paintings. The rose color left the wall, but kept its spot on the paintings.

Here is a closeup of the framed pictures on the right.
I found a bunch of cool old pamphlets and advertisements in an antique shop. I cut them all to pieces, framed them individually with black constructions paper and glued them onto some cardstock. They were meant for the kitchen but happened to be the right size for the bathroom. Now, people get to read about the weird ways that people thought about bananas in the 1960s while they take a trip to the baño.


How about a couple more after photos:

Sorry that they look completely different. One was taken with a flash and the other wasn't.
The photo below is a better representation of the real deal.


For a while, this was one of the only rooms in the house that I called completely finished. But it has recently made its way off that list. Now, I am ready to change up the art again. I want something a bit brighter. And you know I will let you in on it when it happens!

And a very HAPPY BIRTHDAY to one of my best (and most pregnant) friends!!!


Friday, January 11, 2013

The Bonus Room Chronicles: Step 5: Part 1: Window Seat & Built-In Bookcase

Welcome back to the world of Chronicles. Can you believe it- it has been over a month since any of The Chronicles have hit the front page of Never Listless. It is about time showed back up again.

Today, we get to take a look at the funky, retro bonus room again. And, we get to see one of my favorite changes that Scott and I have made to this house... the built-in bookcases and window seat!


I had just shown you the new furniture arrangement when we left off in November.


I also showed you the wire display

 and the wall of frames.

Now, let's take a look at the process of building our new edition to the bonus room! 


Here is the wall that was soon to become beautiful!

First step: move everything out of the way.


Second: Curtains and blinds come down. Take down the chair rail and baseboard where the built-goes. Build the shelves. Scott's dad was a HUGE help in building this (Read: he basically built it for us).

Next: Build the frames for the window seats and the cabinets.
You can see the cabinet frame in the background. Most of this was built in the bonus room since it was too big to move.

I considered painting underneath the chair rail blue and tested it out on an area that was soon to become hidden.

Scott cut a hole in the cabinet so you could still access the electical outlet.

The long piece in the photo below is the start of the window seat. The peak-a-boo head in the background belongs to my lovely husband. No Cora peak-a-boo shots in this post. That little lady was livin' it up in my tummy still back then. As you can also see below, Scott painted the background of the shelves blue!

The next thing to do was to get everything in position.


It was a looooooooong process- I think it took almost a year and a half total. Because of that, I am going to break it down into two parts.

There you have it, folks- part 1 of 2 of seven steps. Let's drag this bonus room reveal on as long as possible.

Here are the 4 steps that got us to the point we are at and the 2 and a half steps left to go!


The Bonus Room Chronicles Introduction Post

Step 1: Move in. Paint the walls. Put up curtains. Put up art. Paint orange design. Paint polka dots.

Step 2: Put up wire display.

Step 3: Put up wall of frames.

Step 4: Move furniture around. Get rid of TV. Add bed.

Step 5: Part 1. Part 2. Part 3: Build window seat and built in bookcases.

Step 6: Change out the bifold doors

Step 7: Part 1.  Part 2. Part 3. Finishing touches

Monday, September 24, 2012

More About 80s Cabinets!

You're still reading? Good! That must mean you are really looking forward to a post about 80s cabinets! 

I could hear you chanting it... 80s CABS 80s CABS. Well, your wish is my command. 80s cabinets is what we will be talking about today.


In case you forgot... this is not the first post I have written about 80s cabinets. That is why this one is MOOOOOREEEE About 80s Cabinets!


Yep... this is what I do with my time. I take a photo of cabinets from the 80s and attach it to a super cool 80s girl (wearing  jellys, a SBTB cut-off sweatshirt, an Anaconda flap cap, smiley faced earrings, slap bracelets, and a mullet). I am normal.

A few weeks ago, I talked about painting the 80s cabinets in the lake house we thought we were going to move into.

Then, I mentioned painting an oak wet bar black.
Later, I showed you my first try at cabinet painting when I had no idea what I was doing.
And don't you worry your pretty, little heads because in the future I am going to show you some bathroom cabinets that I painted.

I get a lot of questions about how to paint cabinets. You could say that painting cabinets is my specialty. You really shouldn't say that though.

Well let's get this party started! I am going to show you some before and afters of 80s cabinet transformations!


I ran into a lot of really impressive cabinet redos when I looked into how to make cabinets like these:


from the Rustoleum Transformations website

look a little more like these:


Photo from here


So, without further ado here are the before and afters that impressed me most:


Before:
Photo from Rustoleum Transformations. I have never used the product Rustoleum Transformations but they have a great gallery of before and after photos that people have submitted. People seem pretty happy with them. 

After:
Photo from Rustoleum Transformations

Before:
Photo from Rustoleum Transformations
After:
Photo from Rustoleum Transformations

Before:
Photo from Rustoleum Transformations
After:
Photo from Rustoleum Transformations

Are these makeovers TOTALLY BLOWING YOUR MIND OR WHAT?
I know they aren't the most amazing thing you have ever seen. But for the cost of a gallon of paint and a weekend of your time... WHAT A DIFFERENCE!

Before:
This not so attractive kitchen was found here.
After:
The impressive after photo can be found here.


My father-in-law suggested adding bead board and trim to the cabinets we were planning to redo. It sounded like a great idea to me. So I did my research and found someone who had already done it.

The blog In Between Laundry has some wonderful photos and advice about how to take ugly cabinets, add bead board and trim and make them beautiful! Her father-in-law seems to be involved in her cabinet redo too!

Here is the kitchen when they moved in:


This is what they did to each cabinet front.


And this is what they came out with! This is the best after photo I could find. I think they are still working on the kitchen.


So, there you have it! 
Life lesson of the day: Ugly kitchen cabinets can be transformed. 

And, last but certainly not least... A HAPPY BIRTHDAY PHOTO OF MY BFF ANGUS!


Here is a photo of the birthday girl enjoying Thanksgiving dinner on the beach in '05!


Wednesday, September 19, 2012

The Bonus Room Chronicles

More Chronicles! 

People kept saying, "Laura, The Nursery Chronicles and The Master Bedroom Chronicles aren't enough. WE NEED MORE." Well, fictional people, I tell you HERE IT IS! 

This is the story of how one person's screening room became our "Funky, Retro Bonus Room."

When we were considering buying this house they had set the bonus room up as a media room. There are speakers on the walls and ceilings! They had a projector and a projector screen in place! We loved that but knew it wasn't practical for us.


What was practical?
Cue the Fooseball table, the silly chair and the funky, retro design on the wall.


We set it up as an office with a bunch of extra living space.

It is probably the biggest room in the house.

There was the Wake Forest Fooseball table. There was a bizarre red, corner piece of a sofa without the other 75% of the sofa. Scott loved that red sofa-chair. Well let me let you in on a little secret- that bizarre, red sofa-chair did not make the final cut. Scott was SADDDDD to see that thing go. But as I told you here Scott lost his decorating vote when he bought a grease-stained, wood-paneled, corduroy couch on Craigslist for $100.


Below are some photos of what the bonus room looked like a few months after we moved in


Here is a close-up of the chair. Scott claimed it was comfortable. I still do not understand how. Maybe if you give that pie-shaped seat the ol' 180 it could be tolerable. Either way, Senor Craigslist stepped in to solve the problem for us again.


There were art prints on the wall being held up by sticky tack. There were polka dots like I had when I was little. There were home-made curtains. This funky, retro bonus room has a bit of everything.

I'm going to do things a little different on these chronicles. I am not going to give away the happy ending quite yet. You will have to make it through the following steps to see where we are today:


The Bonus Room Chronicles Introduction Post

Step 1: Move in. Paint the walls. Put up curtains. Put up art. Paint orange design. Paint polka dots.

Step 2: Put up wire display.

Step 3: Put up wall of frames.

Step 4: Move furniture around. Get rid of TV. Add bed.

Step 5: Part 1. Part 2. Part 3: Build window seat and built in bookcases.

Step 6: Change out the bifold doors

Step 7: Part 1.  Part 2. Part 3. Finishing touches


Stay tuned for a special post tomorrow!