Showing posts with label step by step. Show all posts

Wednesday, May 15, 2013

The Nursery Chronicles: Step 8: Put Up The Curtains, Line The Dresser

I am trying my best to wrap up all of the chronicle series before we move out of this house. Right now, we are one down and three to go. 

I am sorry to tell you that this particular step is not the most exciting one, unless you consider giraffe fabric exciting. In which case, you are going to go BONKERS over this post!

The last time that The Nursery Chronicles graced your eyes, we were painting things yellow and hanging them on the wall. This time, we are hanging curtains and lining dressers.

Curtain Hanging:
I didn't take photos of the actual process so you just get the before and after. After many trial and error lessons learner we now get the curtains before hanging the curtain rod if that is at all possible. That way, you don't have to worry about the curtains being turning into high-water-pants. You can make them hang wherever you want!

Here you go... the before curtains and after on the right side of the room:


And, on the left side of the room:

The monkey heads resting on the curtain rods are funny hats that my BFF gave to me at my baby shower. She suggested we bring them to the hospital and wear them there. So, we did!
When we got home, we put them back on their curtain-rod-resting-place.

Drawer Lining: 
For this, you get a little photo run-down:

These are some pretty obvious steps, but you get them anyway. If you want to make your life even easier you can just get contact paper or don't line your drawers in the first place! I lined these because I had tons of extra fabric, I wanted the drawers to look pretty, and I bought the dresser off Craigslist and I didn't exactly trust a few spray downs to make it clean.

Step 1: (Thank you New Kids on the Block, every time I ever say "Step 1" I sing "you can have lots of fun). Step one, make sure your fabric is nice and straight and cut off any stringy edges.
Step 2: Measure the drawer and mark the fabric.
Step 3: Cut the fabric.
Step 4: Learn that there is an easier way to match up velcro than by using an intricate arrangement of strips.
Step 5: Put the fabric in the drawer and figure out the velcro arrangement from there.

Tada! Done!!

Ooooohhhh, but this isn't over just yet. Now, I would like to show you what lovely and talented ladies I have in my family! As I said earlier, my mother-in-law sewed the fantastic curtains that you just saw. 

My sister made all of the pillow covers! They looked professional!


My sister-in-law made Cora a super adorable quilt. I had tonsssssss of leftover giraffe fabric so she used that on one side and quilted some neat stuff on the other.


And, my mom, who is not much of a seamstress held onto every toy and book that her future grandchildren could possibly want. And, let me tell you, they (Cora anyway) LOVESSSSSS herself some 1980s Fisher Price toys. That is not my mom's only talent- she broke out her inner seamstress and made this funky rug-thing. It is more of a closet-wall-rug, in my opinion. But nonetheless, it is still cool. 


So, thank you to all of the talented women in my life who helped make Cora's room into the colorful baby abode that it is today. 

Here are the Nursery Chronicle step-diddy-do-dahs that got us to where we are now:


Step 1: Get rid of the old furniture and try out some more baby-centric duds for the room. Crib, bookshelf, and daybed.

Step 2: Convince my husband to do more painting than anyone would ever want to do in their whole life. Start the painting spree by painting over the headboard on the wall. Get a dresser/ changing table and refinish it.


Step 3: Get some more furniture. Start the decorating: Wire display for pictures.


Step 4a: Put up the book slings.


Step 4b: More decorating: Floating shelves.

Step 5: Decorations, Part 3: Hang art above the crib and all around the room

Step 6: Refinish side table and get an ottoman


Step 7: Paint the chalkboard and mirror and hang them.


Step 8: Put up the curtains. Line the inside of the dresser with some of my extra fabric


Step 9: Finishing touches.


And here are a few after photos from the nursery:


Tuesday, February 5, 2013

The Bonus Room Chronicles: Step 5: Part 3: Window Seat & Built-In Bookcase

It is Chronicle time around these parts! Step 5 is the star of the show today; Step 5, Part 3 to be exact. I am sorry to drag this out so much, but that is just the way it goes!

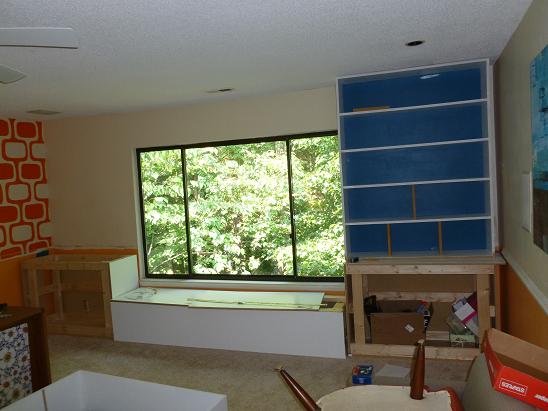
We left off The Bonus Room Chronicles with all of the big pieces in place. The only things to do were to trim it, paint it, and decorate it.

The third installment of Step 5 will cover the trimming and decorating. 

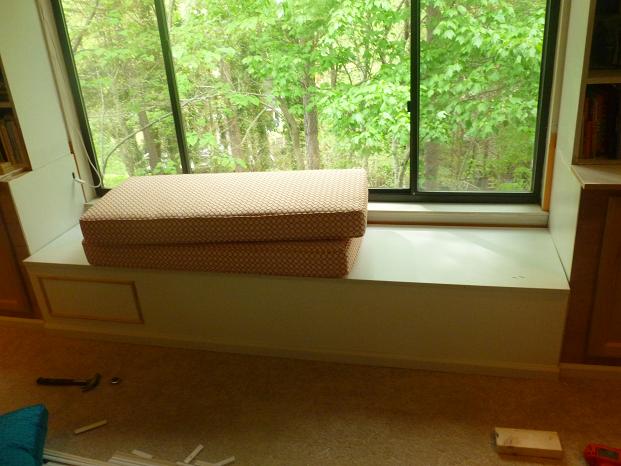
Here are our temporary decorations. The colors are right, but the placement is not. I just threw whatever I had around up there to see what worked.

Then, we painted everything white, and touched up the blue. We added crown moulding at the top,  and trim around the edges. To fill in the small empty spaces from the wall to the bookshelves, we used luan plywood.
Here is the left side all finished up.

Here is the right side all finished up.

 Here is a little 11 month old baby enjoying her finished bookshelves and window seat.
Actually, it looks like what she's really enjoying is starring at Big Bear. But her mama was definitely starring at and enjoying the built ins being finished.

Here is the right side with its somewhat temporary decorations.

Lefty loo is hanging out and being cool too! 

Just two more steps until we get to check this Chronicle series off our list. In Step 6, we will change out the bifold doors. Lastly, in Step 7, we will decorate the built in, do some painting and call it done!

In case you missed any of the previous steps and need a little refresher course you can find them here!


The Bonus Room Chronicles Introduction Post

Step 1: Move in. Paint the walls. Put up curtains. Put up art. Paint orange design. Paint polka dots.

Step 2: Put up wire display.

Step 3: Put up wall of frames.

Step 4: Move furniture around. Get rid of TV. Add bed.

Step 5: Part 1. Part 2. Part 3: Build window seat and built in bookcases.

Step 6: Change out the bifold doors

Step 7: Part 1.  Part 2. Part 3. Finishing touches

Tuesday, January 22, 2013

The Bonus Room Chronicles: Step 5: Part 2: Window Seat & Built-In Bookcase

The Bonus Room Chronicles are back. You have seen step 1 through 5, but we are stuck on step 5. Last week, we checked out the first half of the window seat/ bookshelf building process. It is time to make our way into step 2.


Last week, I left you here:

The frame was built. The shelves were built, but they hadn't become buddies yet.


PART TWO TIME!
It was time to acquaint the cabinets with their soon-to-be buds, the shelves. 
The bookshelves are 4 feet wide. After building them we decided they needed some more support. So, we added some boards to the shelves that alternate- one board per shelf, two boards per shelf.

Then the frame for the top/ light box was built and put into place.
I am not sure why it looks like there is a snow storm in this photo or why Scott and his dad are doing such a thorough examination of the right side of the frame. But there it is- snow and exams.

More hammering. More snow.

A little fastforward... The bookshelves have been painted, the lights are installed. There is even some temporary staging of the bookshelves in place.
Hey Big Bear!

Time for the cover to go up on the top of the shelf.


To figure out what size doors we should get for the cabinets I made some door fakers.
Cardboard on top of cardboard.

The doors were delivered and we installed them.

We added some detail to the light box cover.

Detail was added to the window seat.


And that is where I am going to leave you. Step 5 has turned into a 3 step process. But I promise you that very very soon you will get the big reveal.

Bonus Room Chronicles Step Team in full force below:


The Bonus Room Chronicles Introduction Post

Step 1: Move in. Paint the walls. Put up curtains. Put up art. Paint orange design. Paint polka dots.

Step 2: Put up wire display.

Step 3: Put up wall of frames.

Step 4: Move furniture around. Get rid of TV. Add bed.

Step 5: Part 1. Part 2. Part 3: Build window seat and built in bookcases.

Step 6: Change out the bifold doors

Step 7: Part 1.  Part 2. Part 3. Finishing touches


Thursday, December 27, 2012

The Living Room Chronicles: Step 2: Craigslist Deal Of A Lifetime

Welcome back to The Living Room Chronicles!

I will keep you enticed by telling you a story about a crazy deal from Senor Craigslist.


Actually, this isn't just a crazy deal from Craigslist. This is Step 2: THE CRAIGSLIST DEAL OF A LIFETIME. I may be exaggerating just a bit, but it was a pretty darn good deal.

OK, follow me here. It gets a little tricky.

Charlotte became my home almost 7 years ago.  I moved into an old duplex in an awesome part of town with my husband to be and his roommate.  At the time, they had an orange corduroy couch with wood paneling.  As you might imagine, it was, by far, the ugliest couch I have ever seen. And, to top it off, it sagged like you wouldn't believe.  Lucky for me, he had a matching arm chair. When you sat in it, it would explode in every direction and practically throw you off the back of it.  There were permanent grease stains where your head goes on both pieces of furniture.

It had to go... everyone knew it.

So, one fortunate day I was looking on Craigslist and came across these two couches for $100 total!  I called immediately and went to pick them up that night.

Here's a Christmas photo from 2007. The couch Scott is sitting on is one of the two welcome, non-grease-stained additions.

Here they are after we set them up in our current house.

They were only a few years old and didn't have any major stains or tears.  

We immediately threw out the arm chair and listed the wood paneled couch on Craigslist.  Someone came and bought it for $85.  It was insane.  I wish I had a photo of this couch.  It is hard to believe that something that ugly and gross existed. It was even harder to believe that someone else would want to own it.  

Fast forward 2 years.  I decided it was time to upgrade our couches.  I will spare you the spreadsheets, templates and ridiculous amount of research that I did to finally land on a sectional made by Ikea. 

Here is our Karlstad sectional configuration. I found this photo from my Google image searches. It was taken at an Ikea showroom.

I did a lot of measuring and remeasuring- there was definitely a template or two drawn. 

In the end, ol' Karlstad the sectional fit perfectly into the living room. No exaggeration... if it had been a quarter of an inch bigger it wouldn't have fit. So, it was time for my Craigslist couches to hit the hay.  

I listed them at $300 total. That was $200 more than I paid, but I was pretty sure I could sell it for that. I also said that if it was picked up that day I would sell them for $250. The emails started coming in! One lady went crazy for them. The only problem was that she said she got paid the next day and wouldn't be able to give me cash until then.  Are you starting to think that this might be turning into one of those Nigerian scams where you get a bizarrely written email telling you how much they love your item. And that if you send them some money they will pay double what you're asking. It's not.

So, back to the story. I was willing to wait a day for her to pick them up. She asked if I would be interested in a trade.  Let me tell you... I am ALWAYS interested in a trade. She could have offered me a pair of size 5 roller blades with a wheel missing and I would have considered it. Luckily, she had just traded her last pair of 2 wheeled roller blades. So, she offered me $100 cash and her 32" HD flat screen that was only a year old. Her husband worked for a Best Buy type store and got a good deal on it. As fate had it, I had just started looking for a flat screen about that size or smaller for my bedroom. She arrived, made the trade. And we were both very happy with the deal. A deal had been made!

If you think about it... I had two nice sofas for about 3 years for free and got a free TV out of it!
Quite the Craigslist deal!

Here is my new Ikea sectional.

The old coffee table didn't fit. That is why Step 3 is a new coffee table!

And now, I will share the After Photos with you.


Now, let's talk about the steps that got us there!

7 Step Aerobic Steparinos for you:


Step 1: Move in. Put in whatever furniture we had. Hang art.


Step 2: The Craigslist deal of a lifetime


Step 3: New coffee table


Step 4: DIY remote control holder. A tiny, tiny step, but we are still calling it one.


Step 5: Should we change out the fireplace?


Step 6: The plant table and the plants

Step 7: Finishing touches


Tuesday, December 11, 2012

The Living Room Chronicles. Step 1: Move In, Hang Art


Welcome back to The Living Room Chronicles! 


A couple of weeks ago I introduced you to the living room we met when we bought our current house. 


Today, I am going to take you through Step 1: Move in. Put in whatever furniture we had. Hang art.

My mom came to visit us not long after we moved into our house. Apparently, I had not taken any photos of our house after we moved in. Luckily, my mom takes everyday photos like we are at Disneyland. It was around Easter and she had an egg hunt for Scott and I. That is why there are pillows thrown all over the place. The floor is super messy because we were in the process of ripping up that carpet. The random dog is named Lawrence. He is my brother-in-law and sister-in-law's dog.


Look at that beautiful Camellia tree!

I would rather not have shown you this flattering "throw candy in my mouth" photo. But it is the only one I could find that really showed you this side of the living room. 

This was all still in the process of being set up. We were still in the "pile everything into a room and try to make it work" phase. 

Here is Grandmama hanging out with Lawrence. 

Easter Egg Hunt time! 

After this initial stage, we:


We have 6 more steps to get us to the finished product. But, let's go ahead and take a look.


The After Photos!!!


Now, let's talk about the steps that got us there!

7 Step-Diddy-Do-Das for you:


Step 1: Move in. Put in whatever furniture we had. Hang art.


Step 2: The Craigslist deal of a lifetime


Step 3: New coffee table


Step 4: DIY remote control holder. A tiny, tiny step, but we are still calling it one.


Step 5: Should we change out the fireplace?


Step 6: The plant table and the plants

Step 7: Finishing touches