OK. You got me! You have seen the table before. You saw it here when I wrote a thrilling post about drawing a million versions of it in my high-tech computer program, Paint.
But here is what you have to look forward to in this post:
- a list about what we consider our furniture upgrades
- a very extensive write-up about the table in question
- and BOB BARKER! Gotcha again! If you are following along closely to this blog you know that Bobbie B isn't setting foot here until we get to The Bonus Room Chronicles: Step 2!
On with the show...
We have been slowly transitioning the furniture in our house.
Stage 1: We accept anything that is free! This includes things that were given to us, furniture we had when we were little, anything that was REALLY, REALLY cheap (practically free).
Stage 2: Upgrade to slightly nicer furniture from our buddy, Craigslist.
Stage 3: Upgrade to Ikea and Target furniture.
Maybe there will be more stages in the future. But, for now, Ikea, Target, and Craigslist are treating us pretty well.
We got the table below from Scott's parents.
I don't think they ever used it. That could be because the table pictured above could not perform any of its most important table duties.
Scott's parents offered it to us and we were in stage one (free stuff!) so we happily took it!
I really liked the body of the table but I didn't care for flowers that were stenciled on top of it. Sorry, I don't have any photos of it in the flower stage. I didn't take any until I transformed it into what Scott called "the skeleton desk."
I used it in the living room. Eventually, we bought a new sectional and the skeleton desk lost its home. I am big on reusing so I set to work thinking of where it should reside.
The master bedroom was also going through its own transition so I thought I would give the desk a chance there. I was falling out of love with this art deco-ish vanity that currently called the master bedroom home.
So, out with the art deco vanity and in with the skeleton table (with some modifications). I wanted to add more yellow and grey to my master bedroom and thought that the skeleton table might be the perfect opportunity to bring it in.
I envisioned a brown top (so it would fit with the other brown furniture) and either a yellow or grey bottom.
I painted the top brown... didn't like it and thought a blue line would help tie in some blue from the room and, at the same time, break up some of the brown. I did a terrible job spray painting so I had to rethink the whole thing.
I also painted half of the bottom yellow and the other half grey in order to help me pick between them. I chose grey.
I decided to keep the brown edge and the blue line and cover my spraypainting mishap by painting the inside grey.
I don't know where the blue drawer really came in... I think I just got excited about having extra spray paint.
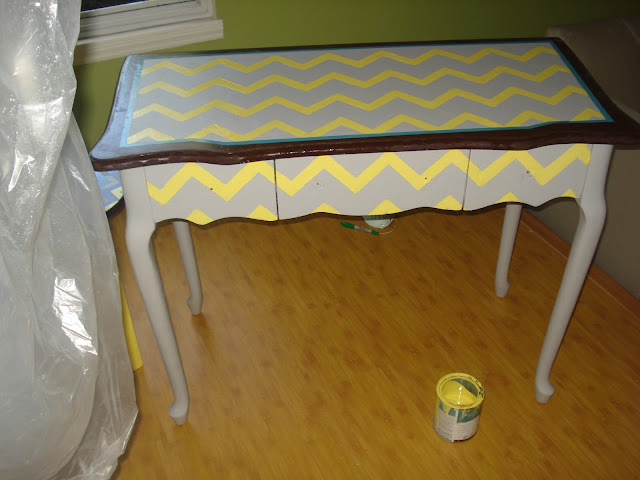
I wasn't excited by the way it looked and still really want to bring in some yellow. So, I added a yellow chevron pattern.
In this photo, it may look like I am done... nope. The lines I drew to make the chevron pattern showed through the paint. I also had some mistake lines and they were really obvious.

So, I painted some Killz on the lines and repainted.
I painted the knobs grey with a yellow circle outline.
Then I polyurathained the whole thing to make it more durable and TADA!
I also did some chevroning a stool in the master bedroom. Unfortunately, I did the chevroning like an Edward Scissorhands wannabe so it didn't turn out fantastically.
.JPG) |
| Check out the sweet phone on the chair. Do you like how I prominently displayed it for the photo? |
That concludes Step 3! I've enjoyed having you! Stop by tomorrow for some toddler words of wisdom!
Below is a list of the steps that got us from where we started to where we are now. And at the very end I have the AFTER photos of the whole Master Bedroom Chronicles.
Step 1: Move in. Throw a bunch of random stuff into the room and live with it for a while to figure out how we wanted to use the space.
Step 2: Rearrange the furniture and add a seating area.
Step 3: Redo a desk with a funky chevron pattern.
Step 4: Redo an old chair for the desk.
Step 5: New comforter and lamps.
Step 6: Headboard, Part 1
Step 7: Make some wedding related art.
Step 8: New entertainment center.
Step 9: Add some new art
Step 10: Headboard, Part 2. Finishing touches. Try to bring it all together.
Here is a little reminder of what the Master Bedroom turns into after all of the steps are complete:
Don't forget that there are three Chronicle series going on right now! Forget prime time TV. Just wait a week for your new Chronicles episodes and you will be set! The Nursery Chronicles, The Bonus Room Chronicles, and The Master Bedroom Chronicles


.JPG)


I was with Scott on the Skeleton table. I remember trying desperatley to talk you out of painting the legs grey, I know better now!!!
ReplyDeleteThat is my fav room, no wait the dining room is, but I like the living room and bonus room as well.The nursery is also lovely...oh heck I love your whole house.
Thanks, mama!
DeleteI really like the way your MBR looks but I can't say I'm a fan of the desk. It looks too much like Charlie Brown's sweater.
ReplyDeleteThanks, Dad. Scott calls it a Charlie Brown desk now too
Delete