Thursday, August 7, 2014

Decorating Bins With Kid Artwork Bunting

Closets are sacred around here. You know we like to use every inch of space (example #1 #2 #3 #4) and closets are the hidden gems that make our house work. So it is time for another closet in town to shine. And that closet belongs to my sweet little baby girl.

Eventually, we plan for Cora and August to share a room. A very smart lady suggested that we give them each a space that is just theirs when shared bedroom city comes to town. And that space is called Cora's huge closet.

We are calling it her "hidey hole" to differentiate it from her and August's cubby hole. Too many holes? I am not ready to introduce you to it completely but I wanted to give you a taste of the pink party that is involved and let you in on a fun little way to decorate plain bins.

Cora got to pick the colors of her hidey hole and it is no secret around here that her favorites are pink and yellow. I even let her pick the swatch.  It turns out that "Shrimp" is the winning shade of pink in her eyes.

I found a few bins in the Target dollar aisle. They were $3 each and a bit better looking than the bins you can find at the dollar store. The only problem is that pink walls and pink bins equal WAYYYY too much pink. This is when my love for bunting stepped in to solve the problem. Cora's artwork display was in need of a big purge so I decided to make use of her lovely paint strokes by turning it into bunting.
you can see another bunting project in the background that I still haven't shared with you.

I hammered a few nails in each bin. Then I cut a few pieces of yarn and kind of randomly strung and knotted the yarn across each bin.

Next, I cut out diamonds from colorful bits of Cora's artwork. Then I folded the diamonds in half and glued them as triangles on the yarn.

I take photos of the pieces of art that I like the best and plan to use them as the backgrounds in photobooks that I will one day make. And I save a couple of my very very favorite drawings.

I was so happy with how it turned out and how easy it was! Usually, a project like this would end up on my to-do list for a year and then I would end up doing something else. But I just decided to do it right away (ignoring the other year old to-dos) and I am loving it! It really broke up the massive pink explosion and it makes me happy to see some of Cora's old artwork.


I hung the yarn a little differently on each bin so they didn't look identical.
Pink Party!

Tuesday, July 8, 2014

The Big Yard Overhaul Starts!

When Spring hit Scott spent most of two full weekends working on our front yard. He also goes outside to check on and admire his plants at least 6 times per day. That dude is obsessed with plants. There are a lot lot lot lot lot of plant jokes being made in our hizzie these days.
We don't have much land to deal with but he redid every inch. I loveeeeeeeeeeee it! And, there is more to come (he couldn't find what he wanted in the store so he ordered some plants online... craziness! We are super-futuristic-Jetson-people ordering plants online). And, there is more to grow (secret bulbs hiding out waiting to surprise us with their beauty!).

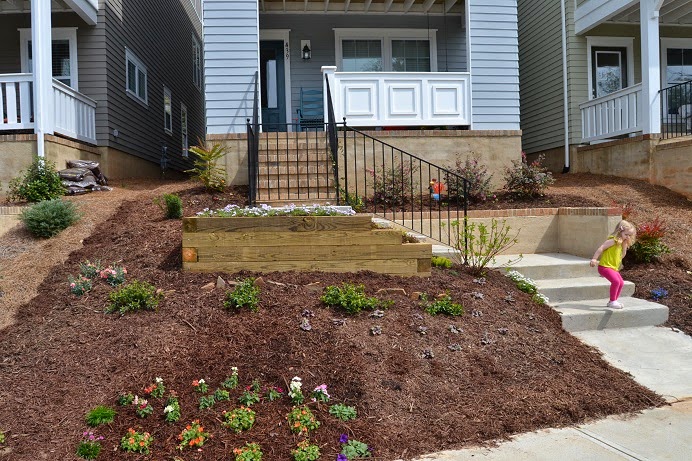
I am tricking you here and it isn't fair but I am going to show you a really updated yard photo and then just talk to you about round one of Scott plant time.

I have been meaning to post this post for a long time. Because of that all of the super-futuristic-ordered-online-bulbs have now popped into our mailbox, into the ground, and have peaked out of the ground with some greenery. Sooooooooooo you will have another thrilling yard update very soon. Every week or so Scott says, "OK I am done for the year." Then he rinses off his shovel and retires his gloves. But guess what happens... those plants pull him back in again. He can't help himself. He wants every inch to be covered. Then he realized that there was room left to catch the sun's rays on both levels of our porch so those spots got planted up too. Please don't misunderstand me. I love these plants and I am thrilled that they make Scott so happy!

Let's get on with the plant convention, shall we?
Here is what we started out with.

There was lots of Juniper. At the time, I thought it was fine. Scott did his plant magic and fine turned into fine-tastic. Uhhh Whoa Whoa who liked that cleverness?

First, he built a wall with the help of his dad.

Then round one of plants went in
Scott got all of the plants situated and did lots of rearranging.


We bought Roosty the Rooster and gave him a home. Those plants on either side of Roosty (called Loropetalum) were the only things that made the cut from the landscaping we had when we moved in. Scott planned to ditch them but they  had pretty purple blooms when he started and decided to give them another chance.

Cora hearts him big time

Here comes plant nerd time. I got some info from Scott so I could tell you a little about what you are seeing. He did a lot of reading about his plants before he planted them. Then he came up with a couple of spreadsheet presentations for me. I had a little say in the whole deal but not much.


The Creeping Phlox didn't have flowers for very long. Cora loved all of the pink flowers and wanted to smell them every minute. The four plants in front of the wall are Gardenias. Scott thinks the Snap Dragon flower is fun.

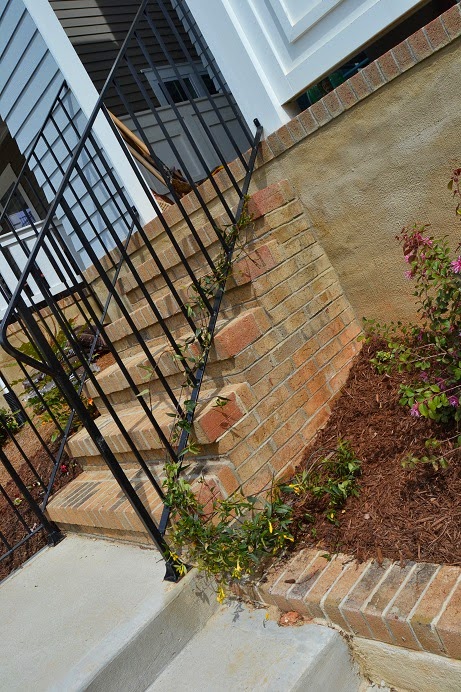
Somehow, despite all of the reading he did, he didn't realize that this vine is a people-killer. Seriously, one bite and it could be fatal. It is called Carolina Jessamine and it no longer resides on our railing or anywhere near our house. 

This one is my favorite. I love the chartreuse color. It is called Stonecrop and it has spread like crazy! 

Here it is again and there is a little succulent sneaking around behind it called Hen and Chicks. It has popped out two chicks and has changed location in the yard once. Scott is constantly digging up plants and moving them around. 

This red stemmed plant is called a Red Stem Dogwood. It is pretty cool because when the leaves fall off it shows off its awesome redness! 
The little purple ground covering has been hard at work. Looking outside right now, that stuff has gone wild. It's called Burgundy Glow Ajuga. It has started to grow on me a bit but at first it reminded me of a weed.

 This Bonsai-ish-looking plant is called Harry Lauder's Walking Stick. I think she's pretty cool but apparently she is supposed to look pretty droopy and it is confusing.

Wow! It is crazy how different this first round of yard overhaul is from what is going on out there now! I will try to be quick with the next update. It is fun to see how much things have grown- for me, anyway, and we all know it is fun for Mr. Planterino.

Here is a peak of Round 2. Scott brought the whole squad out to show it off. We are seriously up to Round 35 now. I will be kind and include the rest of the yard updates in no more than 2 more posts.
At the top left of that photo, you can see a spiny-looking plant called Winter Sun Mahonia. It was one of Scott's favorites but we don't think it is going to make it through year one of the new landscaping. Fascinating, I know.

This is another current view of Cora with Bee Balm and her bee pals. 

I'll be back soon with some more updates for you!

Monday, June 30, 2014

Here's What's Coming Your Way!

Sorry for another phantom post last Monday. I have a thrilling post about Scott's plants almost ready for you but I just need him to do a little plant IDing and he's a busy dude. I should have it for you next week or the week after.

Who needs a little update about all of the random things that will be coming your way over the next few months?
Everyone?!?!?! OK, let's get to it!

My sister came to town and brought with her... a sewing machine! Ohhh buddy it was exciting. She had fancy cutting devices that are sharper than anything I've ever used and were pretty much life changing.
And I made some BUNTING! Have I told you how much I love bunting? I want to cover every inch of my house with it. It is going in the living room as a photo display. It isn't complete but here's a little peak:

Cora's closet hidey hole is coming along nicely. It is not good looking yet but the function is starting to show!


Garage clean number one hundred and thirty three is taking place this weekend.

We cut a little hole in our garage to get some extra storage under the stairs = SUPER!

I added some shelves to the cubby behind Cora's Cubby.

Scott put up some swings for the kids in front of the garage.

The foyer is in the process of a big makeover. We painted it. A new lamp came in. Art came down and art went up. A mirror got painted and hung, as did some repurposed window shutters.

An art wall is in the process of going up in the stairway.

I've been painting some Mexican-inspired art.

A Master Bedroom Closet Update (sorry... I did this update a LOOOONGGGGGG time ago) but it more than doubled our storage so it will be shared.

There was a pantry update that happened approximately 33 years ago but will still be shared.


The living room got a mini update with a clock and a painted frame.

And... THE YARD! It should be the next post you see. But the good yard stuff will come in the future. That yard is really looking good these days!

And there you go. A little update for you. I hope you have the happiest of happy days today!

Monday, June 9, 2014

Paint City Keeps Rolling In The Bathroom

It is another paint party here at Never Listless. I have some other exciting new things to show you on the blog but they will just have to wait. Let's keep rolling on the paint train. A month or so ago I showed you the beautiful artwork that Cora painted for our hall bathroom. Now you get to see how awesome that art looks with some fancy paint behind it. The paint color is Gray Horse by Benjamain Moore. It is the same color that we used in the hallway outside the bathroom. 

dfjsdjkfsfsfkjds I love it. It really may be my favorite room in the house!


Anyone interested in taking a look at the befores?
And, now, here are some more photos of my fanciness:
Who likes looking at my toilet plunger and cleaner? You know you do. I know it isn't super classy but it is so much better than my usual deal (having a plunger in a grody plastic bag). This little contraption sells at Big Lots for about $7.99. I have bought 2 of them over the last 5 years. 

Peak-A-Boo paintings! I just wanted to show you that I painted the ceiling too. Painting ceilings seems like a crazy idea until you do it and you want to stare at it all day because it looks so good. That may just be me. But boy oh boy does it look a thousand times better than the rest of the off-white ceilings in the house. 


Isn't that a cute little stepping stool?

The End!

Monday, June 2, 2014

Displaying Kid's Artwork In A Slightly Classier Way!

Get ready... Things are about to get a whole lot classier in here.

You have seen glimpses of how I used to hang Cora's preschool art... taped and sticky-tacked to the wall.

I had been looking for a way to display all of the art Cora brings home from preschool and change it out regularly. That girl is a painting machine. She often comes home with 3 or 4 new masterpieces per week. It took me a while but I finally landed on an idea.

Old boards and magnets!

I bought 3 8' 1x4s and "olded-them-up" (yes, that is a real term). I used a hammer, screws, chains, nails, and a random belt-hole puncher that has come in handy more than a few times.

Lucky for me, I had my handy little helper girl with me. She had her own hammer. It lit up and exploded with noise every time she hit the wood.

Next, Scott stained them. I loved how they turned out.


We let them dry for a couple of days and then we used Liquid Nails to glue on strips of metal that I had bought from Lowes. I had to buy the metal strips in 4' sections because their options were limited. So, each board had 2 strips on it. We put paint cans and random heavy things on them and left it overnight.

OOPS! The next day, when I returned to admire them the ends of a few metal pieces were pulling from the board. I messed with them a little and they pulled right off. So I scraped all the Liquid Nails off and we tried again with even more Liquid Nail. So much that it bubbled out of the sides. No Bueno. That didn't work either.

On to plan #2. The boards were looking awful from all of the glue and scraping. So I flipped them over and olded up the other side. Then Scott stained them and we were ready to try again. This time we ran a very thin bead of Liquid Nails down each metal strip. Then we got some chunky bolts and screwed them right on the edge of the metal so it kind of clipped it in place. Yay! It worked! I felt certain that those heavy metal strips would stay in place. If you do this project I recommend using a bolt with an even bigger head so it really grabs the metal.

Now it was time to enlist the help of some kind visitors. My mom and her husband, Emery, were coming into town just as we finished our art display construction. I located the studs before we painted recently so I could patch my stud-finding holes in advance. Now all I had to do was a bit of math to figure out how to center the boards and where the studs would hit.

Here is my calculation work. There was some weird math going on but it ended up working pretty well.

To secure it to the wall, I used the same bolt head that I used to clip the metal on. I just used a much longer screw that would go through the wood and drywall to the stud. I put 2 bolts in each board. I threw a 3rd (and 4th... measuring wasn't perfect) into one of the boards that bowed out a bit in the center.

I bought some magnets off Amazon and I plan to eventually paint them or glue pretty paper on them. Cora is old enough that she wouldn't put these in her mouth. But I am going to trade out the lowest board's magnets for some bigger ones when August is mobile just in case one ever ends up on the ground and he tries to eat it.

Here is our lovely painted wall before the art party came to town. The color is Gray Horse by Benjamin Moore.

Here are some more photos of the final project. If you really pay attention you will notice that these photos were taken at different times and that Cora is in the background of some of them perfecting one of her crayon drawings.


Keep on reading! Here are a few more kid-related decorating ideas: