Showing posts with label bonus room. Show all posts

Monday, February 25, 2013

The Bonus Room Chronicles: Step 6: Change Out The Bi-Fold Doors

Welcome to a new week! I am writing this on Sunday night and I already have a case of the Monday Blues. Aside from busting up my internet, I was pretty productive this weekend. I have figured out that what I really need in order to light a fire under me is visitors. I don't like people knowing about my huge piles of junk in various spots around the house. So, I work hard to get things tidied up before they get here. We just had a couple of quick pop-in visitors, but it was enough to get me to workin' hard!

I remember when I was living in an apartment with some friends I used to have the messiest room on the planet, but it would only take me about 20 minutes to get it looking spotless. The key was that I had a bunch of boxes hidden behind my bed that I would throw everything in. Clearly that was a better solution than dealing with the clutter. 


Once my dad was visiting, and as always, I had waited until the last minute to clean up. So, I put everything on top of my bed and threw the comforter over it. I spent a few minutes patting things down so it didn't look like I had magazines and lunch boxes and whatever other random thing was floating around my room hiding under the covers.

Now, it is time to move onto the fascinating reason you are all here today: BI-FOLD DOORS!

This is probably the most boring step in any of the chronicle series. I am sorry about that!

The house came with louvered bi-fold doors and they just weren't my style. I think in the right environment they can look fantastic, but in this room they really dated it, especially with the "funky retro vibe" we had going on. Scott changed them out himself and the whole process was pretty easy. I didn't take any photos. Just follow the directions that come with your door. They know what they're talking about!

So, we went from this:

To this:


To this:


WHHHHAAAAATTT! Is that what I hear you screaming at your computer? Where did the funky retro vibe go? Well, we are in the process of de-funkying and de-retroing our house right now because....

THIS
LOVELY
ABODE
WILL
BE
GOING
ON
THE
MARKET
SOON!

Sorry, the one word per line thing may have been a bit much, but I think you liked the dramatic effect of it just a little bit. The cat is out of the bag. If you live in Charlotte or are looking to move to Charlotte, this tropical paradise of loveliness could be yours! I will tell you more about everything in another post soon to come. 

Back to the land of chronicles! Here are the steps that the Bonus Room Chronicles have passed through, along with the very last step. Yay! There is just one more step to go before we can cross this chronicle off our list.


The Bonus Room Chronicles Introduction Post

Step 1: Move in. Paint the walls. Put up curtains. Put up art. Paint orange design. Paint polka dots.

Step 2Put up wire display.

Step 3Put up wall of frames.

Step 4Move furniture around. Get rid of TV. Add bed.

Step 5: Part 1Part 2Part 3Build window seat and built in bookcases.

Step 6Change out the bifold doors

Step 7: Part 1.  Part 2Part 3Finishing touches


Here are a few more photos of the bonus room where we left it last time.


Tuesday, February 5, 2013

The Bonus Room Chronicles: Step 5: Part 3: Window Seat & Built-In Bookcase

It is Chronicle time around these parts! Step 5 is the star of the show today; Step 5, Part 3 to be exact. I am sorry to drag this out so much, but that is just the way it goes!

We left off The Bonus Room Chronicles with all of the big pieces in place. The only things to do were to trim it, paint it, and decorate it.

The third installment of Step 5 will cover the trimming and decorating. 

Here are our temporary decorations. The colors are right, but the placement is not. I just threw whatever I had around up there to see what worked.

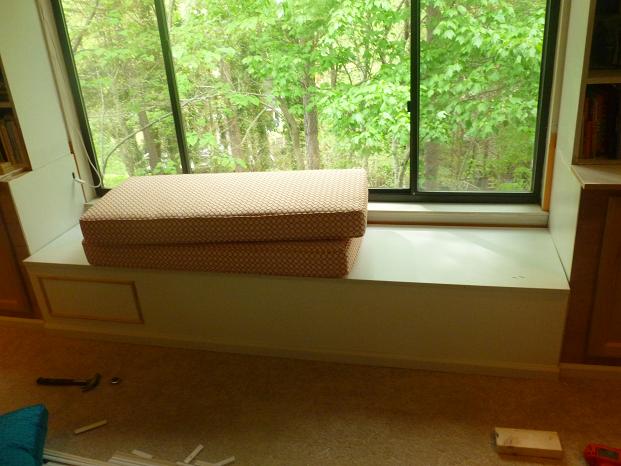
Then, we painted everything white, and touched up the blue. We added crown moulding at the top,  and trim around the edges. To fill in the small empty spaces from the wall to the bookshelves, we used luan plywood.
Here is the left side all finished up.

Here is the right side all finished up.

 Here is a little 11 month old baby enjoying her finished bookshelves and window seat.
Actually, it looks like what she's really enjoying is starring at Big Bear. But her mama was definitely starring at and enjoying the built ins being finished.

Here is the right side with its somewhat temporary decorations.

Lefty loo is hanging out and being cool too! 

Just two more steps until we get to check this Chronicle series off our list. In Step 6, we will change out the bifold doors. Lastly, in Step 7, we will decorate the built in, do some painting and call it done!

In case you missed any of the previous steps and need a little refresher course you can find them here!


The Bonus Room Chronicles Introduction Post

Step 1: Move in. Paint the walls. Put up curtains. Put up art. Paint orange design. Paint polka dots.

Step 2Put up wire display.

Step 3Put up wall of frames.

Step 4Move furniture around. Get rid of TV. Add bed.

Step 5: Part 1Part 2Part 3Build window seat and built in bookcases.

Step 6Change out the bifold doors

Step 7: Part 1.  Part 2Part 3Finishing touches

Tuesday, January 22, 2013

The Bonus Room Chronicles: Step 5: Part 2: Window Seat & Built-In Bookcase

The Bonus Room Chronicles are back. You have seen step 1 through 5, but we are stuck on step 5. Last week, we checked out the first half of the window seat/ bookshelf building process. It is time to make our way into step 2.


Last week, I left you here:

The frame was built. The shelves were built, but they hadn't become buddies yet.


PART TWO TIME!
It was time to acquaint the cabinets with their soon-to-be buds, the shelves. 
The bookshelves are 4 feet wide. After building them we decided they needed some more support. So, we added some boards to the shelves that alternate- one board per shelf, two boards per shelf.

Then the frame for the top/ light box was built and put into place.
I am not sure why it looks like there is a snow storm in this photo or why Scott and his dad are doing such a thorough examination of the right side of the frame. But there it is- snow and exams.

More hammering. More snow.

A little fastforward... The bookshelves have been painted, the lights are installed. There is even some temporary staging of the bookshelves in place.
Hey Big Bear!

Time for the cover to go up on the top of the shelf.


To figure out what size doors we should get for the cabinets I made some door fakers.
Cardboard on top of cardboard.

The doors were delivered and we installed them.

We added some detail to the light box cover.

Detail was added to the window seat.


And that is where I am going to leave you. Step 5 has turned into a 3 step process. But I promise you that very very soon you will get the big reveal.

Bonus Room Chronicles Step Team in full force below:


The Bonus Room Chronicles Introduction Post

Step 1: Move in. Paint the walls. Put up curtains. Put up art. Paint orange design. Paint polka dots.

Step 2Put up wire display.

Step 3Put up wall of frames.

Step 4Move furniture around. Get rid of TV. Add bed.

Step 5: Part 1Part 2Part 3Build window seat and built in bookcases.

Step 6Change out the bifold doors

Step 7: Part 1.  Part 2Part 3Finishing touches


Friday, January 11, 2013

The Bonus Room Chronicles: Step 5: Part 1: Window Seat & Built-In Bookcase

Welcome back to the world of Chronicles. Can you believe it- it has been over a month since any of The Chronicles have hit the front page of Never Listless. It is about time showed back up again.

Today, we get to take a look at the funky, retro bonus room again. And, we get to see one of my favorite changes that Scott and I have made to this house... the built-in bookcases and window seat!


I had just shown you the new furniture arrangement when we left off in November.


I also showed you the wire display

 and the wall of frames.

Now, let's take a look at the process of building our new edition to the bonus room! 


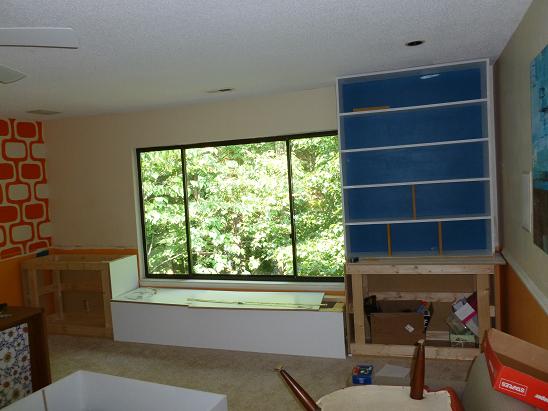
Here is the wall that was soon to become beautiful!

First step: move everything out of the way.


Second: Curtains and blinds come down. Take down the chair rail and baseboard where the built-goes. Build the shelves. Scott's dad was a HUGE help in building this (Read: he basically built it for us).

Next: Build the frames for the window seats and the cabinets.
You can see the cabinet frame in the background. Most of this was built in the bonus room since it was too big to move.

I considered painting underneath the chair rail blue and tested it out on an area that was soon to become hidden.

Scott cut a hole in the cabinet so you could still access the electical outlet.

The long piece in the photo below is the start of the window seat. The peak-a-boo head in the background belongs to my lovely husband. No Cora peak-a-boo shots in this post. That little lady was livin' it up in my tummy still back then. As you can also see below, Scott painted the background of the shelves blue!

The next thing to do was to get everything in position.


It was a looooooooong process- I think it took almost a year and a half total. Because of that, I am going to break it down into two parts.

There you have it, folks- part 1 of 2 of seven steps. Let's drag this bonus room reveal on as long as possible.

Here are the 4 steps that got us to the point we are at and the 2 and a half steps left to go!


The Bonus Room Chronicles Introduction Post

Step 1: Move in. Paint the walls. Put up curtains. Put up art. Paint orange design. Paint polka dots.

Step 2Put up wire display.

Step 3Put up wall of frames.

Step 4Move furniture around. Get rid of TV. Add bed.

Step 5: Part 1Part 2Part 3Build window seat and built in bookcases.

Step 6Change out the bifold doors

Step 7: Part 1.  Part 2Part 3Finishing touches

Wednesday, November 28, 2012

The Bonus Room Chronicles: Step 4: Furniture Rearranging!


The Bonus Room Chronicles are back and I know someone is going to be excited... Grandmama, I am talking to you! I am sorry that they went on hiatus but we are about to be one step closer to the big reveal.


Today, we are flying top speed into the world of:


Step 4: Move furniture around. Get rid of TV. Add bed.


After that, there are only 3 steps until the big reveal!!!!

Step 4 came about when we lost a guest bedroom to Cora's nursery. We decided to change around the furniture in the bonus room to make it better fit our needs.

I don't jump into anything without a ridiculous amount of time on Google Images and a template or two!

I measured the room, drew it up on graph paper. Then I measured and cut out all of the possible furniture. (Yes, I am a major nerd who used to have way too much time on her hands).

My Template!

We couldn't figure out a way to make it all work... even with the template! 


There were too many pieces to consider:
  • the window seat and built in bookcases we knew we wanted to build
  • the guest bed (couldn't lose that considering how many visitors we got when Cora came on the scene)
  • the desk
  • the couch and coffee table
  • a few chairs
  • a seating area with a table
  • a play area for Cora
  • didn't want to lose the funky retro vibe
  • 2 sets of bifold doors that took up the majority of one of the longest walls in the room
  • a TV and entertainment center


Finally, Scott suggested that we ditch the TV. I was majorly into that idea. He realized that we could use one of his TWO monitors as a TV if we ever really wanted to watch TV upstairs. You can turn the monitor easily to watch it from the bed or the couch.

That TV dump was all I needed to get the template to work in my favor!

Here is what the room looked like before the big transition.


And here is the post-template retro funky bonus room!


Here is a sneak peak at the view from the built in bookshelves/ window seat you get to see in the next step!


Step Team in full force below:


Step 1: Move in. Paint the walls. Put up curtains. Put up art. Paint orange design. Paint polka dots.

Step 2Put up wire display.


Step 3Put up wall of frames.


Step 4: Move furniture around. Get rid of TV. Add bed.


Step 5: Part 1. Part 2. Part 3. Build window seat and built in bookcases
 

Step 6: Change out the bifold doors


Step 7: Final touches