Showing posts with label inspiration pics. Show all posts

Friday, March 22, 2013

10 Easter-Shaped Yummy Eats!

Did you miss me yesterday? I sure missed you lovely lovely people. Apparently, I am channeling Mr. Rogers right now or maybe my cuz, Bob Ross.

Earlier this week we checked out some snazzy Easter decorations. Easter certainly getting any further away so let's take a gander into the world of food shaped like Easter bunnies and other Easter-y things!

Bunny Breakfast! Cantaloupe, blueberries, strawberry, honey, and, marshmallows on a pancake. You know you like it!

Coconut Bunny Cake! Deliciously cute. 

A snack tray in an egg carton. People these days are crafty! 

Someone lost their mind when they called this pizza. It is a cute idea and a fun snack, but everyone knows that in NO WAY is that pizza.

Once again, someone decided that this is pizza. People are acting a fool up in here. Take some inspiration from this photo and make a cute egg-shaped vegetable tray. Leave off the questionable purple food though.

Bunny mask cookies. I KNOW that's right! 

The only problem with this super adorable carrot patch treat is that everyone knows wafers are the grossest! 

Mmmm Cheetos, the most delicious junk food in the world.

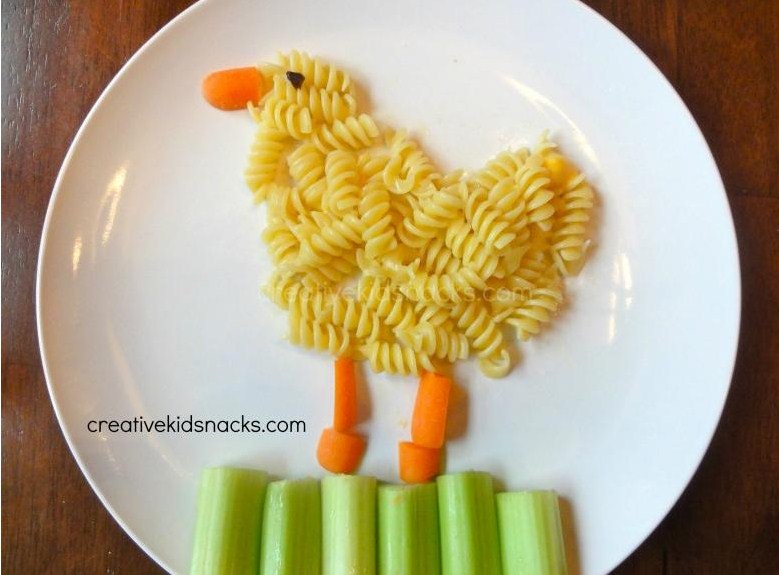
 A noodle shaped chicken. Yesssss!
And, the last thing I have for you on this fabulous Friday is some cute bunny biscuits. 


Happy happy happy Friday! I hope your weekend is just what you need. Stay tuned to The Etc. Lists tomorrow for a some Cora time.

sources: Bunny BiscuitsBunny MaskCoconut BunnyCarrot Patch WafersCheeto CarrotsEgg CartonBunny PancakeCarrot "Pizza"Egg VeggiesChick Pasta

Wednesday, March 20, 2013

Making Over A Kid's Table & Chairs, Part 1

I am a bit behind... I still owe you a 2nd post about our Christmas 2012. You will see it over on The Etc Lists within the next couple weeks. For Christmas, I gave a little table and chairs set. It is called Latt and it is from Ikea. As usual, I couldn't leave the set just like I bought it. I had to dress it up a bit. Also, as usual, it took me about 10 extra tries to get it right. You get to see all of my exciting spazzy errors in Part 2 of the Ikea Table.

Here is the before and after:

I do love some green!

I always start a project with some serious brainstorming. I think about the colors I want to use and I picture what kind of vibe I want to end up with. As soon as my brain has exhausted all of its ideas I head on over to the Google machine. I like to see what other people have come up with. 
From my brainstorming I knew that I wanted a chalkboard top and plenty of color.

Here are some of my favorites Latt Hacks (the sources are at the end of this post):

A colorful top! I hadn't even considered just painting one area. Google was already up 1 on me.

Fabric and paint! Fantastic! I loved the idea, but was worried about the durability. 

Another inspired person wrapped their Latt chairs in fabric. Pretty funky! 

Who doesn't love a map! This one is super neat, but not quite the vibe I was going for. 

This Map Latt was closer to my vibe, but I do not have near enough talent to make that.

A chalkboard top! And, they color-blocked the chairs. A great idea! 

I was excited to find this one. Ikea green was one of the colors I was considering. So, I was happy to see that someone else had already tested it out for me. And, with a chalkboard top! This was about as close as I was going to get to what I was looking for. 

I drew up a possible design for the chair tops in my favorite program, Microsoft Paint. I wasn't sure what colors I wanted to use so I drew up 4 possibilities.

Now you know the riveting process that went into my Latt-hacking. I'm sure you are losing your mind with excitement about Part 2 coming up soon. 

I will give you one more sneak peak. This photo is from the first time I showed Cora that you could write on the table with chalk. I wrote, "Cora's Big Girl Table" and she insisted that I also draw a hat. So, a sombrero was drawn.

Time for Wednesday's Weekly Rather Question:

WYR:
dfsf be caught in a serious nose pick on national TV (like this guy)

or
have to wear a very strange cartoon-looking sombrero (like the one I drew above) 2 hours per day every day for the next year?


Monday, March 18, 2013

14 Nifty Easter/ Spring Decorations To Get You Inspired!

Spring is in the air and Easter is only a couple weeks away. 

To those crazy-holiday-decorating-fools: The time has come! Let's see some Easter eggs and bunnies lining your driveway! If you don't have a Spring wreath on your door yet I am just going to pretend I don't know you (I hope you caught my sarcasm there. Read on to see how far from the truth that is).

Myyyyyy goodness, do I like things decorated with branches!!! I have never used branches in my decorating, but apparently it is what is missing in my life. Isn't this a happy colorful branchy situation! As soon as I host a big Easter gathering something like this is going to happen. At the very least I will print out this photo and show my guests that I found some good decorating ideas!

Here is a more subdued branchy-situation:

While we are talking about things I love, but have never decorated with... WREATHS! I am a fraud! I wrote a whole post about St. Patrick's Day Wreaths, Christmas Wreaths, and Thanksgiving Wreaths. But a single wreath has never graced my front door or any space in my house. Let's take a look at 2 cute Spring-ish wreaths that are almost inspiring me to make the no-wreath-change.

A bunny! Oh, the cleverness!

For something else that I think is pretty but would never do see below.
I could never bring myself to waste that much candy even though jelly beans are not so impressive.

Something I could get into:
Growing my own decorations! Wheat grass can = Easter grass!

And, you can dress it all up like this:

Now is the time that I would like to show you photos of one of my favorite ways to decorate... Garland! I love it! I am a bare bones decorator when it comes to special occasions, but garland (as long as I can reuse it) is the best!

More lovely garland!

One more! Make sure to click on the links at the end of this post for tutorials or more information on these fantastic decorations.

Fancy Schmancy!

A fun and practical Easter centerpiece. 

Rainbow bunnies in a frame! So pretty! Carrot garland! The coolest!

To wrap up these snazzy Easter decorations, I have plastic eggs in egg cartons. Fun stuff, people. Fun stuff is what is happening around these parts. 

Are you inspired? What new decorations are going up this year?

Friday, March 8, 2013

17 Cool Growth Charts (And 2 Fairly Lame Ones)!

It is time to talk about documenting your height! For the last 18 months I have been keeping track of Cora's height on a freebie growth chart from the hospital I delivered at.

It is kind of cute, but I started thinking about how much cuter it could be.

My mom gave me the old chart that Kelly and I mapped our height on (at very random intervals). A few of my friends even made it onto the tallness keeper.

I found tons of awesome growth chart ideas. Don't you worry! I am going to share them with you.

As soon as I began to write this post, I noticed a blog called Bower Power that I check every so often just DIYed one of my favorites!


If you don't want to DIY one, don't you worry. I found some pretty neat height charts that you can buy.
Left: You can find at Ecojot for $12
Middle: Buy it here for $49
Right:  Sorry this red fella is no longer for sale, but you might be able to find something like him here.

You could turn your growth chart into a scapbook of sorts with photos and maybe even a few notes.

Here are some more great growth chart rulers. Isn't that a fun idea?!

You still don't see what you're looking for? I HAVE MORE!
Sorry the cute little teddy bear is so fuzzy!

Here is another take on the scrapbook-type growth chart. Go get yourself a shadow box!

Now, the fish painting below isn't exactly my taste. But, I love the idea of taking a painting (hopefully one that you made yourself so you don't ruin someone else's artwork) and marking heights on that. That little boy loves it.

For the growth chart below, you could leave the name off and use it as a bulletin board or magnetic board. You could even paint it with chalkboard paint.   

This one is one of my favorites! I love the idea of marking a piece of furniture and keeping track of the height that way. 

When I started writing this post, I thought that I would want to have a growth chart for Cora that looks really awesome. But, after spending WAY TOO MUCH TIME with growth charts I realized that it is all about the memories and traditions that come along with recording the height. So, you will probably not see me DIY a fancy growth chart down the line, but keep your eyes peeled for a marked up piece of furniture or some random lines on the wall of my house.

Happy Friday! I hope you all have a spectacular weekend. Go start some new traditions and make a few new memories (growth chart related or not)!

Thursday, February 21, 2013

The Living Room Chronicles: Introduction to Step 3: New Coffee Table

Things are getting crazy around here again. It's Thursday and there is a post up! Let's just call this an introductory post. I want to prepare you for the awesomeness that is going to happen in tomorrow's post. I will just tell you that it involves a car packed full of shipping pallets at the drive-in movies about 5 years ago.

I was in the market for a new coffee table and I went looking high and low to find one. But, it turned out that finding a reasonably priced 36" x 36" wooden coffee table was impossible.

I checked out a dozen or more thrift stores in the area and went to town with Google.
The closest thing that my Google-mania produced was an Ikea coffee table that was just the right size, but only came in white or black. It is now on sale for only $99.99!


Ikea has since come out with this beauty of a coffee table for $199


Here are the rest of the coffee tables I found that inspired what I came up with and will reveal tomorrow. Or... surprise ruiner... you could just check out the after photos that I posted at the end of this post. Remember that this was before the days of a Pinterest-infested world so the inspiration pictures were pretty stinkin' hard to come by!


This is before the day that the world decided to use shipping pallets to make every single piece of furniture in the world. So, I thought I was pretty clever coming up with the idea of stacking a few pallets on top of each other to make a coffee table. I don't know how to make furniture (despite the awesome benches that my BFF Mali and I made in about 5th grade. You had to sit on them at just the right angle so they didn't collapse). So, I consulted with my Handy Man Extraordinaire. He thought I was more than a little bit crazy, but he agreed to do the job. 

I will continue this thrilling saga tomorrow!

Do you want to check out all of The Living Room Chronicles steps?
Here you go!

Step 1: Move in. Put in whatever furniture we had. Hang art.


Step 2: The Craigslist deal of a lifetime


Step 3: New coffee table (Step 3 Introduction found here)


Step 4: DIY remote control holder. A tiny, tiny step, but we are still calling it one.


Step 5: Should we change out the fireplace?


Step 6: The plant table and the plants

Step 7: Finishing touches