Showing posts with label guest bedroom. Show all posts

Thursday, September 27, 2012

The Nursery Chronicles: Step 2: Painting Spree

Welcome back to The Nursery Chronicles.

A couple of weeks ago we checked out Step 1Get rid of the old furniture and try out some more baby-centric duds for the room. Crib, bookshelf, and daybed.


Today, we enter into the exciting world of:
Step 2: Convince my husband to do more painting than anyone would ever want to do in their whole life. Start the painting spree by painting over the headboard on the wall. Get a dresser/changing table and refinish it.

As I mentioned in The Nursery Chronicles start-up post, the nursery used to be our guest bedroom. And for some reason I decided the guest bedroom needed a headboard painted on the wall. Luckily, we had some of the paint leftover.


So, it was easy to turn this:


Into this:


Next up, on the painting list was to transform the dresser we found on Craigslist.
Here is the photo from the CL ad:


I knew I wanted the dresser to be yellow and white but I wasn't sure which sections to paint what. That's when I said HELLO to the super basic program, Paint!


I took wayyyyy too much time trying out possible paint jobs and came up with these options.

#1
#2
#3
#4
#5
#6
Sorry to waste your time with all of the possible options too!
I narrowed it down to 2 and sent an email to some friends and family members (who are kind enough to spend their time looking at such silly things). The answer was overwhelmingly choice #1.


So, off to work my lovely husband went. The hardest part was taking all of the old paint off. The lady who we bought it from thought she was doing us a favor by adding another coat of polyurathane to it right before we picked it up. I can safely say... one of my least favorite favors ever. Not only did that mean Scott had to take even more paint off but it meant that this overcautious pregnant lady had to sit in a car filled with some serious paint fumes. I stuck my head out the window (Ace Venture style) and took in the lovely rigid February weather. Luckily, it was a short drive.


Scott put some paint thinner on, then sanded it down and started adding layers of paint.


Those sure are some freshly sanded drawers.


More paint!


Here is how the lovely dresser turned out after about 50 Scott hours! Thank you again, Scott. You are the best!!!!


That ends this edition of 
The Nursery Chronicles   Step 2: Convince my husband to do more painting than anyone would ever want to do in their whole life. Start the painting spree by painting over the headboard on the wall. Get a dresser/ changing table and refinish it.

Here is a complete list of the steps again in all of their steppin' glory:
The FINAL after photos are at the end of this post!

Step 1Get rid of the old furniture and try out some more baby-centric duds for the room. Crib, bookshelf, and daybed.


Step 2: Convince my husband to do more painting than anyone would ever want to do in their whole life. Start the painting spreeby painting over the headboard on the wall. Get a dresser/ changing table and refinish it.


Here is what you have to look forward to in the future:


Step 3: Get some more furniture. Start the decorating: Wire display for pictures.

Step 4: More decorating: Put up the book slings. Floating shelves.


Step 5: Decorations, Part 3: Hang art above the crib and all around the room


Step 6: Refinish side table and get a few more pieces of furniture


Step 7: Paint the chalkboard and mirror and hang them.


Step 8: Put up the curtains. Line the inside of the dresser with some of my extra fabric


Step 9: Paint the mailbox. Finishing touches.


Just a reminder... when we get through all of these steps we get to this:


Hope to see you tomorrow!

Wednesday, September 19, 2012

The Bonus Room Chronicles

More Chronicles! 

People kept saying, "Laura, The Nursery Chronicles and The Master Bedroom Chronicles aren't enough. WE NEED MORE." Well, fictional people, I tell you HERE IT IS! 

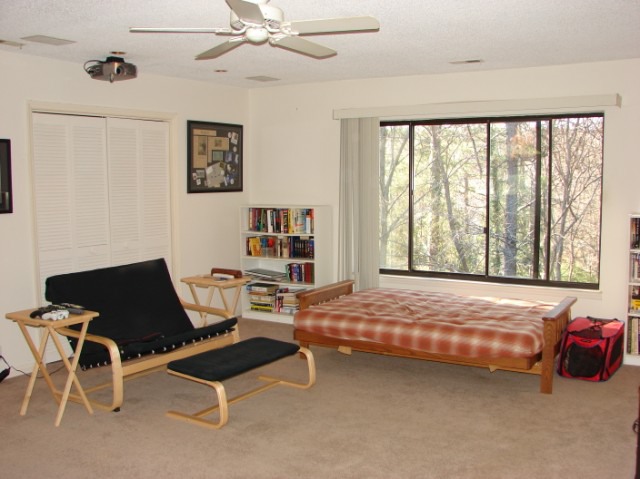
This is the story of how one person's screening room became our "Funky, Retro Bonus Room."

When we were considering buying this house they had set the bonus room up as a media room. There are speakers on the walls and ceilings! They had a projector and a projector screen in place! We loved that but knew it wasn't practical for us.


What was practical?
Cue the Fooseball table, the silly chair and the funky, retro design on the wall.


We set it up as an office with a bunch of extra living space.

It is probably the biggest room in the house.

There was the Wake Forest Fooseball table. There was a bizarre red, corner piece of a sofa without the other 75% of the sofa. Scott loved that red sofa-chair. Well let me let you in on a little secret- that bizarre, red sofa-chair did not make the final cut. Scott was SADDDDD to see that thing go. But as I told you here Scott lost his decorating vote when he bought a grease-stained, wood-paneled, corduroy couch on Craigslist for $100.


Below are some photos of what the bonus room looked like a few months after we moved in


Here is a close-up of the chair. Scott claimed it was comfortable. I still do not understand how. Maybe if you give that pie-shaped seat the ol' 180 it could be tolerable. Either way, Senor Craigslist stepped in to solve the problem for us again.


There were art prints on the wall being held up by sticky tack. There were polka dots like I had when I was little. There were home-made curtains. This funky, retro bonus room has a bit of everything.

I'm going to do things a little different on these chronicles. I am not going to give away the happy ending quite yet. You will have to make it through the following steps to see where we are today:


The Bonus Room Chronicles Introduction Post

Step 1: Move in. Paint the walls. Put up curtains. Put up art. Paint orange design. Paint polka dots.

Step 2Put up wire display.

Step 3Put up wall of frames.

Step 4Move furniture around. Get rid of TV. Add bed.

Step 5: Part 1Part 2Part 3Build window seat and built in bookcases.

Step 6Change out the bifold doors

Step 7: Part 1.  Part 2Part 3Finishing touches


Stay tuned for a special post tomorrow!

Sunday, September 9, 2012

The Nursery Chronicles

Our mountain paradise (we have trees and hills in our neighborhood so that means it is a mountain paradise) was not really decorated in my style when we saw it for the first time. 

When I decorate I usually like to scream COLORRRRR as much as possible all over my house. That is unless, of course, I am compromising with Scott who says that every room in our house does not need "Ikea Green" or bright yellow.

Below are photos of the previous owner's set up. This is the room that was to become our guest bedroom (later Cora's nursery). 


When we moved in we were on a major budget (you will learn this quickly about me and Scott... we are always on a major budget).
The guest bedroom (now the nursery) was not a top priority. So we painted it a grayish color, put up some curtains, made a headboard, threw all of our extra furniture in there and shut the door.

Until about 4 years ago I thought that having pictures framed was one of the most expensive things in the world. Luckily, I learned the "get custom matting, not custom framing" trick like I did here in the foyer
I also thought that headboards cost as much as a brand new car. The obvious solution to the $25,000 headboard dilemma was to paint my own on the wall.

Here is what our guest bedroom looked like after we moved in:


All of that random stuff you see in the background (including the out of place black and white table) are my decorating "extras." The wooden crate is somewhat of an anomaly. It may have lived on the wall like it is pictured for a week tops. There was a nail in the wall and a crate on the floor so I put them together. I wasn't a big fan of it but I guess I liked it enough to leave up there for a week and end up in a photo.


RANDOM, NOT RELATED TO THE TOPIC AT HAND, INTERRUPTION: 
I am staring at my video monitor as I write this post. Cora is trying to settle herself down for a nap. Things had been going so well in the nap department recently. But people do not lie when they say, "once you start getting the hang of the baby thing it changes." 
I have said this quite a few times already (hereherehere) but let me try it one more time... MY BABY WAS NOT BORN TO WIN THE GOLD MEDAL IN THE SLEEPING OLYMPICS. 
She is an amazing, little baby and I feel like the luckiest person in the world to have her in my life but a sleeper she is not.

OK back to the subject at hand which happens to be turning a guest bedroom into a nursery for my little sleepaholic.

I was very excited when I found out I was pregnant... for the obvious reasons. But I was also thrilled to be able to get my spazzy, little decorating fingers into that guest bedroom and get to work!

As of right now, the nursery is the only room in the house that is complete. It is so nice to have one room totally checked off my list!

Here are some photos of Cora's royal sleep dwelling!


There were a lot of steps to get this nursery where it is today. Don't you worry- I am going to go through every little step in some future blog posts for you.

Here is what you have to look forward to:

Step 1: Get rid of the old furniture and try out some more baby-centric duds for the room. Crib, bookshelf, and daybed.

Step 2Convince my husband to do more painting than anyone would ever want to do in their whole life. Start the painting spree by painting over the headboard on the wall. Get a dresser/ changing table and refinish it.

Step 3: Get some more furniture. Start the decorating: Wire display for pictures.

Step 4: More decorating: Put up the book slings. Floating shelves.

Step 5: Decorations, Part 3: Hang art above the crib and all around the room

Step 6: Refinish side table and get a few more pieces of furniture

Step 7: Paint the chalkboard and mirror and hang them.

Step 8: Put up the curtains. Line the inside of the dresser with some of my extra fabric

Step 9: Paint the mailbox. Finishing touches.


I am so excited to share these with you!!!

I know there are some Saved By The Bell fans out there. Let's join together to sing Kelly, Lisa and Jessie's (aka the Hot Sundae) hit "I'm So Excited." You know you remember the episode where Jessie Spano starts taking prescription drugs in order to sleep and she gets a bit crazy.


The photo is from this article about the top 5 most outrageous SBTB episodes.


If you don't know it and you want to act like you were a hip 7th grader back in the early 90s you can check out the infamous clip here.