Showing posts with label yellow and grey. Show all posts

Thursday, February 7, 2013

13 Lovely Gender Neutral Baby Abodes!

Happy Thursday! Let's start today off with a bright and sunny photo! Scott and I didn't know if Cora was going to be a girl or a boy so we went with a yellow, grey and green nursery although I probably would have chosen those colors either way. Let's take a look at how other parents have interpreted the gender neutral thing.

I love this sun clock and clouds! And, who doesn't want an enormous crab and a monsterous dog book on their dresser?

I am a big fan of green cribs (check out Cora's lovely green one below), but those curtains are what's getting me in this photo. And, I'm not sure you can see it but there is an awesome framed pictured of Mr. Potato Head too!


Here's Cora's green machine.

Fantastic arbor-age!  I'm inspired to turn this guy into a painting with some scrapbook paper or neat fabric. I am also loving the funky retro rocking chair.

Banner is my middle name and this is a pretty one! I also thought that thing in the corner was a home-made basketball hoop for a second. That would be a neat idea- to make a pretty one yourself  that fits the theme of the room. Fun and functional! 
The enormous mushrooms are not my favorite unless there Papa Smurf and his gang are living inside them.
Lastly, twine chandelier... yes, please!

Dog silhouettes, striped ceiling and a beautiful chandelier. This one is fancy! 

This fella is a bit different than what I would usually like. So, that's why I included it. Well, that and the super cool yellow dachshund under the crib and gator on the wall.

Wallpaper, ottomans, chair! Yes! 

Funky, everything! I like!

This yellow and grey nursery paradise has matching curtains to Cora's yellow and grey nursery paradise (see photo below). I'm always diggin' on some chevron! And, a practically life-sized giraffe never hurt anyone.

The curtains above don't have a fabulous monkey-head-hat attached to theirs like Cora's curtains do.

Lovely letters! I read somewhere about an idea for a baby shower where everyone brings a letter that they decorate themselves or a random object that looks like the letter. The idea is to have a cool art piece like the one below!

FISH!!!! 

I love these curtains and they look very DIY-able! 

A whole wall of books and a lovely ceiling. This bad boy may just have to be copied! 

No, I'm not pregnant. I am just here to appreciate some beautiful gender neutral nurseries.

sources: love those curtainsfish!, twin curtains, cool wallpaper, animal cool, letters, mushrooms, sunshine, funky, mr. potato-head, tree, book wall, yellow and white ceiling

Monday, December 3, 2012

15 Fantastic Nurseries For Boys!

A couple of weeks ago I posted two photos of boys nurseries in honor of one of my best blog-commenters, Christina. Today, is her birthday!!

She posted a mood board of sorts over on her blog last week. But let's pretend like she is still looking for some inspiration and take a peak into the world of Baby Boy Bungalows.

Boys nurseries I love:

I think the colors in this nursery are fantastic. It never hurts my feelings if you throw in some chevron curtains too!

Stripes on the ceiling- very unique! I love it paired with the dark wall!


Another organe one! The clouds picture that looks like it was made on some sort of graph paper is calling my name. So is that funky lamp at the bottom right. Although I would like to see how long the things on the bench would last with "Ms. Grabby-Hands Gets-Into-Everything McGee."

So, it turns out that I am not a hater of stripes on the wall nor do I think orange stinks. But how could I possibly turn this nursery down with an awesome dog pillow like that?


A grouping of picture arrangements like the one above the changing table always makes me happy. And, as you may have guessed, I am digging the chevron stripes behind the crib.


Hey, Hey! The colors in this one remind me a bit of Cora's nursery! But I think their nursery took a left on Classy Circle and mine took a right on Funky Street.


Different sized stripes... clever!


What a fun and cozy nursery!


Another cool grouping of pictures! And I love that modern glider!


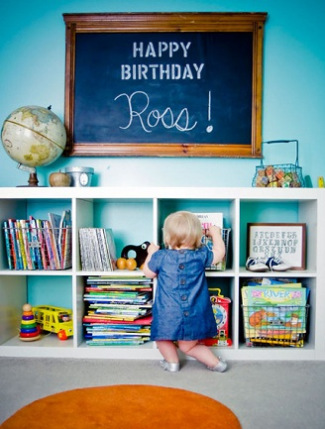
A blackboard and the name ROSS! Fantastic!


Funky and fun. Cora would have a ball hitting those paper lanterns instead of sleeping!


I love everything about it!


Another chalkboard and an amazing orange chair. Very diggable!


Stripes! Fantastic!


This one is way too traditional and classy for me but I still love it!


Well, there they are! People always complain that decorating boys rooms isn't as easy as girls. But according to the photos above, it can be done!


Happy Birthday, Chands!!!
photo taken from her blog, ApartmentFever


ps this really is not any sort of hint. I am not pregnant. I just thought this was a fun post in honor of Christina's birthday!

sources: Ross, blue and white stripe, chevron fan, circle chair, black and white chevron, orange rug, rocking horse, yellow and white, orange dog pillow  cloud picture, paper lanterns, yellow and white ceiling, orange and grey, big map, big stripe curtains, double yellow, orange chair, gray chair, gray and yellow

Monday, October 15, 2012

The Master Bedroom Chronicles: Step 4 And The Start Of The Daily WYR

This past weekend Scott and I went to the lovely and very fun wedding of one of his college friends. It was my first weekend away from Cora and it was a great time... the groom even did a little Young MC- Bust A Move solo! We got to see lots of Scott's college friends. As usual, Scott was tossing out lots of Would You Rather questions. His friend, John, said that he would answer a WYR every day. So, today is the day that the daily Would You Rather (WYR) question starts on Never Listless. It will be at the end of the post. Answer away (John Ake- that means you).

I am going Chronicle-wild around these parts. It is time to take a jog back to The Master Bedroom Chronicles. We are in Step 4 or as the New Kids on the Block would say, "Step Four. I can give you more."

Step 4: Redo an old chair for the desk.


Wooooooooooo! A peak at the after photo first!


Once again, I am a bit of a lame-o when it comes to having a proper before photo. The chair was a brown chair with a fake leather seat cover. It came free with my art deco vanity on Craigslist. I didn't even want it, but they insisted it was part of the deal. So, I took it.


You can see the black, fake leather seat pad in this photo.


I am glad they forced it on me because now I love the chair and am not so fond of the vanity. 
This chair lived in the garage for the first two years that I had it. I was under the impression that the seat would be almost impossible to remove and reupholster. I had done some investigating and that was my conclusion.  A couple of years later, I took another look.  Maybe it was that I had a little more DIYing under my belt. Maybe I was blind the first time I looked. But, as you might be able to see from the photo, this chair is very modify-able!


I started the project immediately after realizing my mistake. Usually, I like to think about things, write some lists, look at lots of photos online, write some more lists. Then, about 3 months later I may take the first step in the project. This time, I was so excited that I went straight to seat-ripping. 

Next, I painted part of it yellow and part of it grey. It turns out I didn't like yellow or grey. I liked the original brown color. So, I had a sanding party. I taught that yellow, grey, and brown paint a lesson. 


I picked out a brown, glossy spray paint.  I found out that glossy was probably not the best idea.  As you can tell from the photos, I could not get the chair sanded down perfectly and the inconsistencies will show up a lot more with a gloss finish than with a flat finish.  


Next up... break out the fabric stash. I found the perfect one right away (because I am a crazy lady with an enormous bin of fabric who doesn't even sew).   I am obsessed with this Amy Butler fabric.  


I used a staple gun to attach the fabric to the seat cushion.


Spray paint time! The key to good spray painting it patience! I like to do 3-5 thin coats about 3 hours apart (depending on what the can recommends). I am not a patient person. I want to spray up a storm and get it all done in one shot. But everyone knows what that leads to- drip city and thick, gooey paint that peels off easier and just doesn't work out. 
Usually, I try to save up my spray painting to do list for one big paint extravaganza. Since I will already be spending lots of time waiting for one project to dry I hardly notice if I throw a few extra projects in.

Other spray painting tips:

  • sand before you paint
  • don't spray very close
  • wear gloves
  • use a mask
  • have good ventilation
  • lots of drying time


 I put the seat back on and YAY... I had a beautiful, new chair... one that I can't believe I tried to pass up for free.


Step 1: Move in. Throw a bunch of random stuff into the room and live with it for a while to figure out how we wanted to use the space.


Step 2: Rearrange the furniture and add a seating area.


Step 3: Redo a desk with a funky chevron pattern.


Step 4: Redo an old chair for the desk.


Step 5: New comforter and lamps.


Step 6: Headboard, Part 1


Step 7: Make some wedding related art.


Step 8: New entertainment center.


Step 9: Add some new art


Step 10: Headboard, Part 2. Finishing touches. Try to bring it all together.


The New Kids on the Block's Step by Step:

Step 1: We can have lots of fun 


Step 2: There's so much we can do

Step 3: It's just you for me

Step 4: I can give you more

Step 5: Don't you know that the time has arrived. HUH!

cover image of another cassette that I wore out from here
Donnie, you are lookin' COOOL!

Here is a little reminder of what the Master Bedroom turns into after all of the steps are complete:


You want more chronicles? You're ready for the next chapter of The Master Bedroom Chronicles? I am sorry to tell you that it's not here yet. But go ahead and catch up on the rest of your stories: The Nursery Chronicles and The Bonus Room Chronicles. 


WYR... Get home and there is a deer in your kitchen. It didn't mess anything up  getting in but you have to deal with getting it out.
or your house smells like pickles for a month.

This WYR is from Scott courtesy of a 6 hour drive.

Friday, September 14, 2012

Fresh, Light, Beautiful Kitchens

I got all excited about the idea of fancying up a kitchen recently. Thoughts were running through my head of redoing the cabinets, changing out the lighting, the flooring, counters, sinks, adding a back splash, fruit bowls, everything.

I began looking at some beautiful kitchens for inspiration. Well guess what! I am going to let you, my friends, in on the fun!

I love a bright, open-feeling, kitchen with lots of light!

Here are 19 examples from some hard-working, talented folks.
This one reeled me in with its beautiful grey walls, the gorgeous greens outside and the wooden beams. This wonderfully-windowed kitchen is from here.
Look at those subway tiles! Look at those glass cabinets! I'm ready to move in. The photo is from these talented folks.


I love the vaulted ceilings on this one and the long bar. These are the fireplace lovin' people who I borrowed the photo from.

This is a house I could imagine growing up in. I would be doing my homework at that island (at 2am because I am a terrible procrastinator). I would be making my pierogies on that stove. I would be breaking those pretty bowls and plates by spastically trying to juggle the oranges. Check out the bead board backing to that bookshelf!


This is one bright and modern kitchen. If I lived here I would definitely feel like I was vacationing in Stockholm but I don't see any problem with that!


Hello backsplash! What a pretty thing! I wish I could see what they are hiding in that open area under the sink. The photo is from these sneaky people.


Add bright yellow into any room and I will be a happy camper. I love how they have cabinets all the way up to the (very tall) ceiling. No wasting here! What a lovely, airy door! This photo is from these  yellow-lovin' dudes (probably dudettes too).


This kitchen has combined lots of different styles and they have done it well. What a fresh, light, beautiful kitchen. Photo from here.

WHAT IN THE WORLD! Who has a view like that? Why have I not been invited. To the people who own this kitchen: Yes, I accept your invitation.


LOVE the industrial look mixed with the calming blues and the awesome backsplash. This is the kind of kitchen where you have a good time making deviled eggs (?) just like the folks above. Photo borrowed from here.


SMART PEOPLE! See through cabinets when you have a nice window and lots of light on the other side of them. Adding some subtle grey tones and beautiful pendant lighting certainly didn't make me turn my nose either. This beaut of a kitchen was found here.


Clever! I am very impressed at how they were able to make this tiny kitchen feel so big. Those floors are driving me wild! Drool-worthy floor photo from here.


How lucky to have two windows in a fairly small kitchen. The bar really opens the space up! I love the wood counters! Photo on loan from here.


What a neat grouping of bottles at the top right of the page. That space is perfect for it. I love that they used a vintage-looking cabinet for the wet bar. Once again, I am digging the back splash on the back wall. This lovely space was found here.


Bead board bead board you are nifty! I love the idea of having a shelf stop right at the top of some tall, bead board wasinscottng. This fresh kitchen was found here.


This one is not exactly fresh and light but it is beautiful. AND look what I see hiding on the left side of the picture. I think I see a loft!!!!! Photo from here


Ohhhh la la! That FLOOR! That ceiling! That beautiful pendant light. This kitchen is wonderful! They even snuck a bunch of my favorite color, green, all over the place. Image from here


This one is a bit country and  a bit shabby chic. All of the light and the wood ceilings are what caught my eye. I do love some yellow and grey too- those are some funky cabinets! Image from here

Last but certainly not least is the gorgeous kitchen from the the clever folks over at Young House Love. They magically turned a dark, wood-paneled, claustrophobic eating factory into this fresh, light, and beautiful kitchen. Image from here.

Our kitchen at our current house is just fixed up enough that the anti-waster in me would be very upset about changing anything. I really like our kitchen and boy oh boy do we have a beautiful view (with lots of windows to show it off). 

All of these fresh, light, and beautiful kitchens have got me itching to get my hands on a real fixer-upper.