Monday, April 29, 2013

Floor Plans And Ideas: The First Floor, Part 1

Happy Monday! 

Last Monday, I showed you a little look at the floor plans for our new house. Who wants to take a peak inside all of the ideas running through my brain about how to use and decorate the space?

This may be pretty obvious, but this is a bit of a "clear my head" post where I can have all of my ideas in one place. I hope you don't mind.
There is a pretty big porch on the front of the house where we will put 2 rocking chairs, a little table and a porch swing that used to belong to Scott's grandparents. We used them at our old house and will certainly change the color after we get situated and figure out what color is best.

Here are a couple of photos of the chairs at our old house:
Yes, I look awesome while carving pumpkins.

Here is my awesome sister enjoying the porch swing with me. 

When you open the door, you walk into a very long foyer. It is fairly narrow- a little over 5 feet. I plan to put in at least two of these Ikea Hemnes shoe holders on the left wall. To make them look cohesive eventually I want to add a big board across the top of all of them. 

The hardwoods will be white oak and should look something like this:

Here are some of things that are inspiring me for that area right now:


Here is a photo of the Hemnes shoe rack from Ikea:

If there is room, a little bar area with stools on the other side might be kind of neat for putting on shoes and getting last minute stuff together.

Let's skip the guest bedroom/ Scott's office/ massage therapy room for now and move onto the garage.
We are losing a TON of storage space as well as usable space in this new house. So, we have to do some major purging and we have to make smart, efficient storage. Just typing the words "smart, efficient storage" makes me smile. Seriously, I could not be more excited about that part!

We have a ton of baby clothes, toys that Cora has grown out of and some hand-me-downs that she is not quite ready for. That makes up probably 25% of our junk. My holiday decorations keep growing and growing. I have a million paintings that I am still working on and we have plenty more random stuff. In fact, every couple of years Scott likes to go "shopping in the attic." We pull out all of his old clothes that don't fit or are clothes that I think he should get rid of but he thinks not and he has a fashion show. Actually, I make him have a fashion show and he gets excited about doubling his wardrobe with random clothes that probably should stay in the attic or, better yet, should make their way to Goodwill.

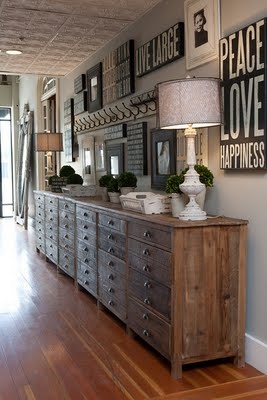
Because of all this junk, we need to be smart about our storage options. I plan to build (with lots of assistance) something like this:


If you are looking for more ideas on garage storage be sure to check out some of my other posts:

If you have been reading along carefully, you may have guessed that in Part 2 of the First Floor we will check out the guest bedroom/ Scott's office/ massage therapy room and IT WILL BE EXCITING!

So, there you go. I hope to see you back here soon!

Friday, April 26, 2013

A New Post Is Up On The Etc. Lists!

It is Cora time over on The Etc. Lists. On Wednesday, I told you about my new blog-writing schedule, but I will tell you again in case you missed it. I am slowing down on the blogerino scene. Since I started writing last August I have been working to find a good balance. I think this might be it... I will post on Never Listless on Mondays and Wednesdays. You will get a post on The Etc Lists on Fridays.

I hope you don't mind the change. I also hope that you have the best weekend ever!!!
I'll be back on Monday with some ideas for how to decorate a long, narrow foyer and some photos of garage organization!


Wednesday, April 24, 2013

Concrete Counters!

Our master bathroom remodel took about 2 years to complete! 2 years! We finished it just in time to put the house on the market. Luckily, we had most of the parts working throughout the remodel. 

Here are a few photos of how it turned out:


I am not going to turn this Master Bathroom saga into a "Chronicles" like I like to do, but I will pop in every once in a while with bits and pieces of it.

When we remodeled our bathroom I had a hard time figuring out what to use for the bathroom counter. I knew it had to be somewhat custom because I snagged this vanity on Craigslist for about $200. It was practically brand new. The people selling it had bought a fancy townhouse that was only a few years old and planned to redo the entire house. A good deal was born!

These are the photos that they had of it on Craigslist. It does not look practically brand new here, but go back and check out those finished bathroom photos at the top if you don't believe me that it was in good shape.


I knew I was going to change the counter because I wanted a double vanity, not a single. I wasn't into the brass faucet. The door pulls did not fit in with what I was going for with my master bathroom redo either.


I am not a granite person. I think it is beautiful and I can completely understand why people go ga-ga over granite. I think of it like this: I like to have art on the wall, not in the fixtures. As you have seen from a lot of my decorating, I like some crazy things on the wall. Here are two examples:


If you had either of these things next to a granite countertop your eyes would go bonkers. I like to keep things simple with the big pieces of my house. That being said, I will have to have a granite countertop in the kitchen in my new house because it was the only option. I'm sure there will be a post or two about that in the future. Who knows, I may become a granite convert just as it is heading out of fashion.

Back to the concrete countertops:
I considered Quartz, Silestone, Corian... I googled my fingers off trying to come up with an affordable option that I loved. Finally, I decided the best thing to do was enlist the help of experts. So, my google fingers went dialing and I talked to a few people from local businesses about what might be my best option. This gave me a chance to get a feel for how much I was going to have to spend and which companies I liked best. 

After gathering all my information, I had made a decision. Concrete, it was! The guy I went with had just recently started his company and gave me a great price. I showed him some examples of concrete counters that I liked:
(I used my fancy dance Paint skills to put this little diddy together for you!)

I am a sucker for gray! And, like I said earlier, I'm into the clean look, not the busy look.

My concrete counter guy told me to pick out a paint chip of the color I wanted the counters to be and he would tint it to match almost exactly. Somehow he convinced me to add recycled glass to mine. I loved it! I had seen a lot of recycled glass concrete counters that had all the colors of the rainbow and I knew that was not my thing. But, he showed me something different- glass that was just a few shades off from the color of your counter so it didn't stand out as much.

Here are a few close-ups.

These photos are of the samples he made. I took a photo of them in different lights.

Here it is installed:

With the sinks:

Another close-up:

Anyone interested in a Before & After?

Whhhhhhhhhhhhhhaaaaaaaaaaaat?!?!?!? How is that even the same space?
I will give you a couple days to ponder that. I hope to see you back here on Friday. I have made another bloggerino-schedule-change. I will now be posting on Never Listless on Mondays and Wednesdays. I will only post on The Etc. Lists on Fridays unless there is something that I cannot wait to tell you!

Monday, April 22, 2013

Moving Into A New House In Less Than 4 Months!

It is happening! I am so sad and so excited in the same breath. Our current house is under contract and our new house is all framed up. I have been putting off writing this post because I am so emotional about the changes that are coming. 

This post is just going to be a little introduction to what our new house is all about. If you know me very well at all you know that I have looked at these house plans no less than one million times since I got my hands on them; I have made a template for each room; and I have tried to come up with a way to maximize every inch of space in the house. 

Let's start with the house plans. Here they are: 
If you can't see them perfectly don't you worry... I will give you close-ups soon.


The good things:
  • The house is smaller = less to maintain, less time spent of me obsessing and decorating.
  • Since the house is smaller I get to spend my time obsessing over how to make the most efficient storage possible!!!
  • Each bedroom has a full bath.
  • It is just a couple blocks away from the library and other awesome downtown Davidson things!
  • The mortgage should be a good bit less expensive than our current house.
  • We are closer to Scott's parents.
  • We are closer to my mom who drives down frequently (the 6 hour drive turns into a 5 and a half hour drive).
  • There are 3 outdoor porches/decks.

The bad things:
  • We lose a lot of square footage.
  • We lose a bedroom.
  • There is practically no yard.
  • We are very close (in proximity) to our neighbors.
  • If we drive to Charlotte too close to rush hour the traffic is ridiculous.
  • No more awesome views of gorgeous trees, squirrel parties, and deer all over the place.
  • No more huge spacious deck to watch the things I listed in the last bullet point.

I am forgetting a thousand things, but this gives you a good idea of everything.

Here is a photo of Cora and Scott checking out the living room to one of the neighbor's houses, which is very very similar but not exactly the same as ours. They are in the living room.


Soon, I will give you a little run down of random things I am thinking about bringing into each room. (I am seriously considering a pulley system from the back deck to just outside the garage door. Scott thinks I am insane!!!).

Sunday, April 21, 2013

Friday, April 19, 2013

The Nursery Chronicles: Step 7: Paint & Hang The Chalkboard & Mirror

The Nursery Chronicles are back soooooooo soon! I know you're excited. I know what you want.

Today, we are jumping into Step 7, where you get to see a chalkboard and mirror get painted and go up.

Chalkboard:
There aren't a lot of things that pass through my house that don't get at least a swipe of the paint brush to them. This chalkboard/ magnetic board from Ikea (called Luns) is no exception.

That practical little guy was first hung on the wall just so we could check something off our list, but soon...


he ended up with a nice colorful yellow painted on him:

The writing on this board was waiting for Cora when she came home from the hospital. We didn't find out if Cora was going to be a girl or boy so we came up with some pretty awesome nicknames for her. For some reason Scott referred to the baby as "Toddles" while she was in my belly. My sister and I named the baby "Santa Sugarbaker" because when I was little I always said I would name my baby "Santa." "Sugarbaker" came into play because Julia Sugarbaker from Designing Women is an awesome sassy southern lady. "Hockpea" is a fake family name. For some reason, it has become a tradition that whenever someone is pregnant on my dad's side of the family we call the baby "Hockpea" until the baby is born. And there you have the run-down of Cora's pre-birth names.

Mirror Time!:
This frame had been hanging around the house for a while and had been used for all sorts of things. I had recently painted it brown and added a remnant of a big ol' bathroom mirror that we took down to it. I had not hung it yet, which made it fair game. The perfect spot for a mirror popped up in Cora's room. So it was decided... Brownie McGee was going to have a whole new life and a bright new color to add to her resume.

Here she is showing off her beautiful brown:

Then, we yellow-ed her up and turned her into this:

Mission accomplished! More yellow added to the room!

Step City is below:

Step 1Get rid of the old furniture and try out some more baby-centric duds for the room. Crib, bookshelf, and daybed.

Step 2Convince my husband to do more painting than anyone would ever want to do in their whole life. Start the painting spree by painting over the headboard on the wall. Get a dresser/ changing table and refinish it.


Step 3Get some more furniture. Start the decorating: Wire display for pictures.


Step 4a: Put up the book slings.


We  made it 3 whole steps before I divided one up. Yes, I'm very sorry. I had to add a part a and part b to Step 4. It was getting a bit long. So, now you get to enjoy it in 2 parts.

Step 4b: More decorating: Floating shelves.

Step 5: Decorations, Part 3: Hang art above the crib and all around the room

Step 6: Refinish side table and get an ottoman


Step 7: Paint the chalkboard and mirror and hang them.


Step 8: Put up the curtains. Line the inside of the dresser with some of my extra fabric


Step 9: Finishing touches.


Here are some photos of the rest of the nursery!


Thursday, April 18, 2013

OO: Tips & Tricks For Organizing The Linen Closet

It has been a while since Organization Overhaul came to town. I know you have missed it so it is back. It's time to clean out the linen closet and get some good tips!

Tip Time:
  • Everyone knows the old pillowcase-sheet storage trick.


  • I'm a big fan of making use of all potential storage spaces. So, I think the the towel bar on the back of the door idea for blankets and towels is a keeper!


  • Baskets and bins help to keep things looking tidy.


  • You could always jazz things up with some pretty shelf paper or add some paint or paper to the back wall.

This one is a bit sassy for my taste, but you get the idea.


  • If you are keeping bottles and things in it, a lazy susan makes a big difference.


Here is my linen closet makeover:

As you can tell, tidying up the towels and blankets made a big difference. I could have spent a little more time and made it look perfect. 

I turned my not-so-pretty cardboard boxes into fancy(ish) little bins. All it took was some scrapbook paper that I already had on hand, scissors, a pen, and some tape.

The Before:

Just lay the box on the paper and trace the front. Then cut it, tape it, and...

Ta-Da!!! The After:

Monday, April 15, 2013

The Nursery Chronicles: Steps 6: Refinish Side Table, Add Ottoman

The Nursery Chronicles are coming on strong. You got one last week, one is in your face right now, and you can expect another one later this week. 

In Step 6 I will show you the side table that we refinished. But that is not all... you also get to see an ottoman come to town!

Side table:
You have seen the side table live in the bonus room au natrule. But, as you may have realized by now, I love to add a little paint to things.

My lovely lovely husband did a bit of sanding and then adding a couple coats of white paint to the top and sides of it.

Here is how it turned out:

Here is a less blurry, less cluttered photo:

Ottoman:
We also added a ottoman because I had heard it is important to have something to put your legs up on while you are nursing. It turns out that I hardly used the ottoman until I discovered that I had a bunch of unused storage space.  (<-- ps check out this link if you want to see some cute photos of a really happy Cora in a bucket!)

Actually, that is not completely true about the ottoman not getting any use... for some reason my mom and I decided that it would be a normal (and totally safe) place to take photos of a 3 day old baby.
It should definitely be noted that there were hands just outside of the camera's view waiting to catch a baby on the move.

So, here it is: a green ottoman that I believe was purchased at Target for about $20.


The Chronicles of my baby's abode are almost complete! Only 4 more steps to go! 

Step 1Get rid of the old furniture and try out some more baby-centric duds for the room. Crib, bookshelf, and daybed.

Step 2Convince my husband to do more painting than anyone would ever want to do in their whole life. Start the painting spree by painting over the headboard on the wall. Get a dresser/ changing table and refinish it.


Step 3Get some more furniture. Start the decorating: Wire display for pictures.


Step 4a: Put up the book slings.


We  made it 3 whole steps before I divided one up. Yes, I'm very sorry. I had to add a part a and part b to Step 4. It was getting a bit long. So, now you get to enjoy it in 2 parts.

Step 4b: More decorating: Floating shelves.

Step 5: Decorations, Part 3: Hang art above the crib and all around the room

Step 6: Refinish side table and get an ottoman


Step 7: Paint the chalkboard and mirror and hang them.


Step 8: Put up the curtains. Line the inside of the dresser with some of my extra fabric


Step 9: Finishing touches.


Here are some photos of the rest of the nursery!